Nature Photography
Bird, wildlife, and landscape photography by Jon Rista
Cleaning up unsightly backgrounds
Welcome to another installment to the Knowledge Center. In this article, I thought I’d cover a post processing technique I’ve started using to produce professional, artistic photos when the realities of the situation prevent you from doing so in-camera. As with photography in decades past, where slight changes in chemical bath, pushing or pulling film exposure, dodging and burning techniques when using an enlarger, etc. were often necessary to fine tune exposure with film and photographic papers…I find post processing to be an essential component of artistic photography in the digital era. As such, I’ve decided to add another area to my Knowledge Center: Pointed Postprocessing. I am not as skilled as some in this area, however I have a number of tips, tricks, and techniques I feel I can share with my readers that may be useful.
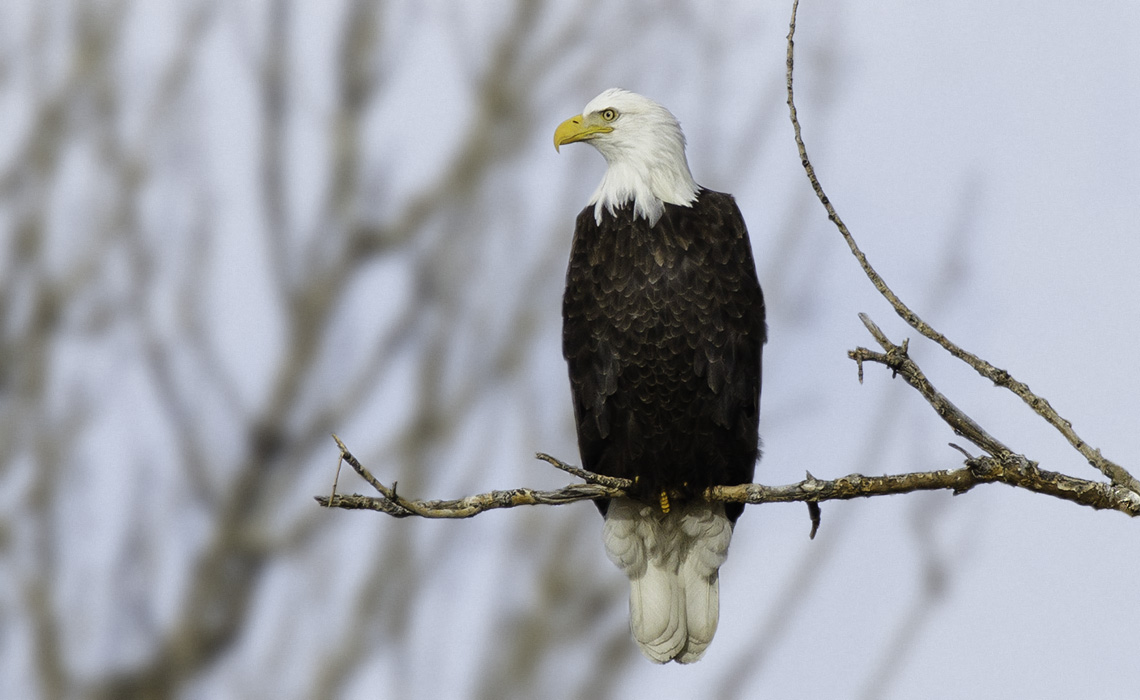
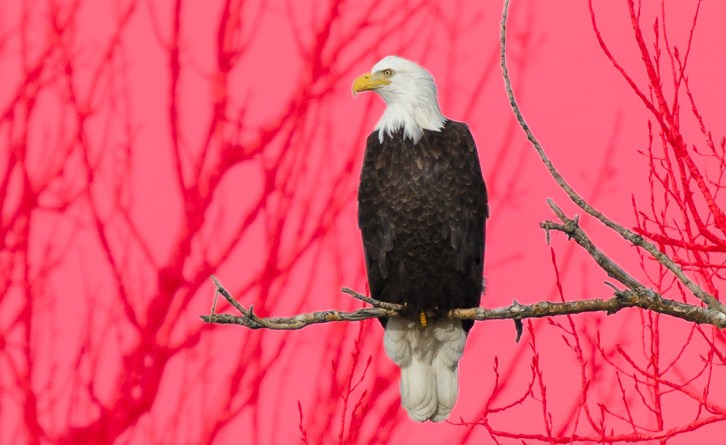
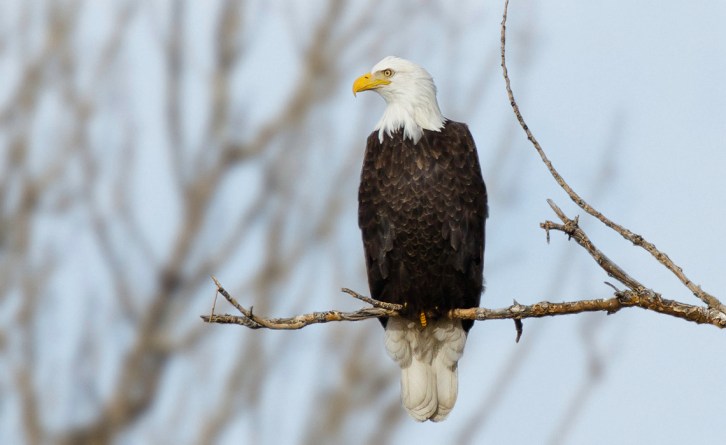
As a bird photographer, I am often presented with the situation where an amazing bird is perched in front of a terrible background, and there is no way to really change that fact. In order to properly expose the shot, keep the subject properly illuminated, and compose in an artistic way, sometimes you just have to deal with a terrible background. In some cases, a better lens can largely solve the problem…using a longer lens with a wider aperture will usually result in a blurrier background, however such lenses often cost thousands or tens of thousands of dollars. Sometimes, you just have to make do with a lesser lens, and sometimes even a $10,000 lens can’t really change your circumstances. Several of my recent uploads of Bald Eagles are examples of this kind of situation. What may not be obvious from the recently uploaded Bald Eagle gallery is that all of those photos originally looked something like this:
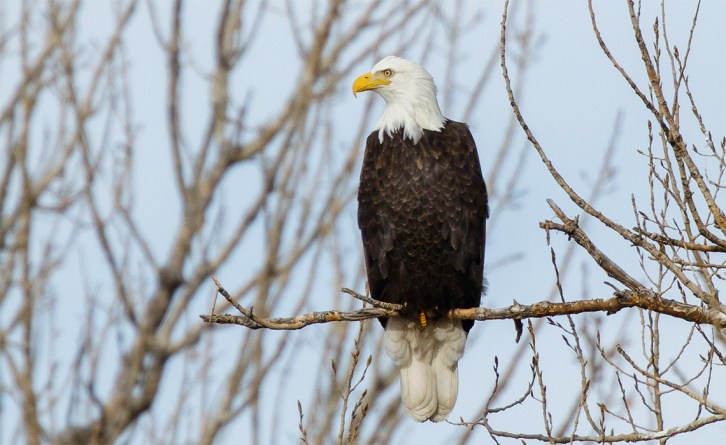
I’ll demonstrate a few simple techniques that will allow you to preserve the detail in the bird, clean up the foreground, and blur out the background to a pleasing level. The only tool I use for work like this is Adobe Photoshop, currently CS6. It is the only tool that offers the breadth, power, and flexibility of tools to do a professional job in minimal time. It is also the only tool that offers effective content-aware tools that make many of the editing tasks demonstrated in this article relatively easy (compared to manual patching, cloning, blurring, etc.)
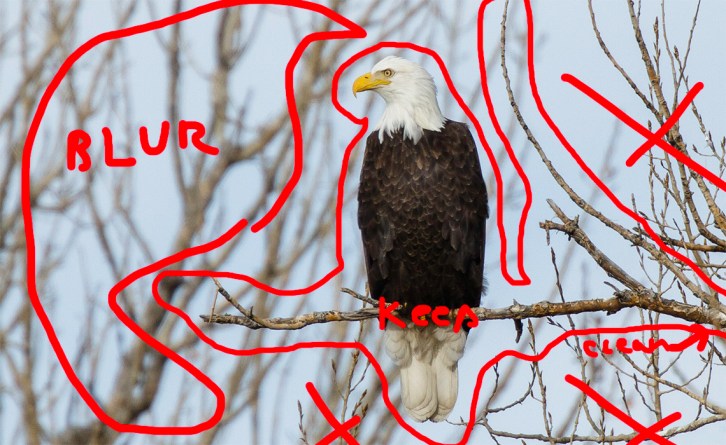
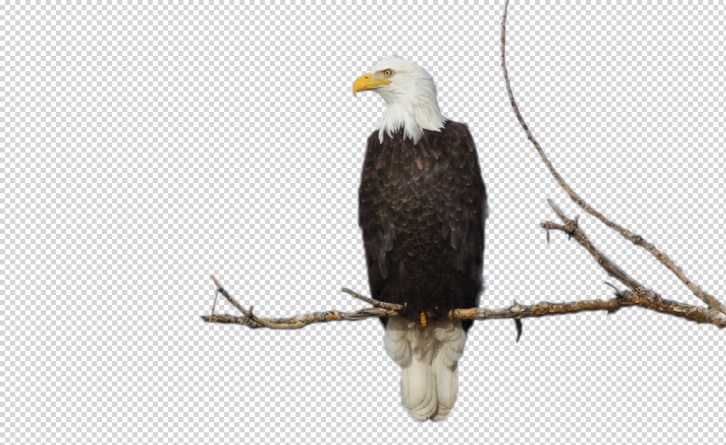
It is best to have a plan and some goals when making a significant edit to a photo. In the case of the bald eagle photos, I wanted to isolate the subject from the chaotic background, eliminate useless foreground detail…in this case the unsightly branches filling the lower right third of the photo, and preserve the primary perch over to the right-hand edge, without losing a sense of realism in the photo. An quick storyboard of my are mapped out in the photo below:
There will be three primary phases in my approach to changing this image of a beautiful bird in a terrible setting, to a beautiful bird in a setting that doesn’t really get noticed. The first phase will be to isolate the bird and its perch into their own layer. The second phase will be to eliminate unsightly foreground content and the bird from a “clean background” layer. The third phase will be to soften and blur the clean background such that it no longer intrudes upon the foreground subject.
Phase 1: Isolating the Subject
Before making any edits, create a copy of the image. The background will remain in it’s original state, in the event that we need to restart we can simply copy and paste the background into new layers and start from scratch. The first step is to mask off the bird, and it’s primary perch, and place them into a new layer. I use the Quick Selection tool to initially generate my mask. Simply “paint” over the areas you wish to mask, and the mask will automatically grow to cover areas of similar tone and color. You might find that sometimes the mask extends into areas you do not want masked. Simply hold alt and paint over those areas again, although more carefully, to restore the proper borders to your mask.
TIP: You can adjust the size and hardness of the tool by holding down alt, holding down the right mouse button, and moving the mouse left/right for size, up/down for hardness.
TIP: Try to keep the brush smaller than the object you are trying to mask, and soften it as as you start masking small or thin objects like branches.
TIP: You can zoom in and out by holding down alt and spinning the mouse wheel.
You will likely encounter some areas that just don’t quick select well. Areas of smooth transition from your object to the background, masking of small/thin objects, etc. often require a more direct and careful touch. Once you have he initial quick selection largely encompassing the area you wish to copy, enter Quick Mask mode. A quick mask is a paintable and erasable red overlay. Anything in red is masked, anything not in red represents your selection. You can use any of the standard photoshop tools in this mode to paint, erase, and otherwise tweak the mask to correct errors that are difficult or impossible to fix with the Quick Selection tool.
When you have completed your refinements of the quick mask, exit Quick Mask mode, and feather your selection by 1 pixel using the Select->Modify->Feather menu. This will soften the edges just a touch, which helps them blend better into the background once it is modified. Copy the selection, and paste it into a new layer. Hide the background and background copy layers, and check that your isolated subject looks complete, does not have any transparency holes where they do not belong, and does not include bits of the image you did not wish to include:
Phase 2: Cleaning the background
Before we can really do much with the background, we need to get rid of the bird from the background. Going back to the copy of the original “Background” layer we created, recreate the mask of the foreground by ctrl-clicking it’s layer. Once the mask is available again, use the Selection->Modify->Expand tool to grow the boundary of the selection by two or three pixels. This will give us some “buffer room”. Once you have expanded the selection, use SHIFT-F5 to apply Content Aware Fill, or CAF. CAF will automatically compute new content for the selection based on the surrounding content, making quick work of replicating the background content and eliminating the foreground subject.
NOTE: You will probably need to hide the layer with the foreground subject to see the effects of content-aware fill.
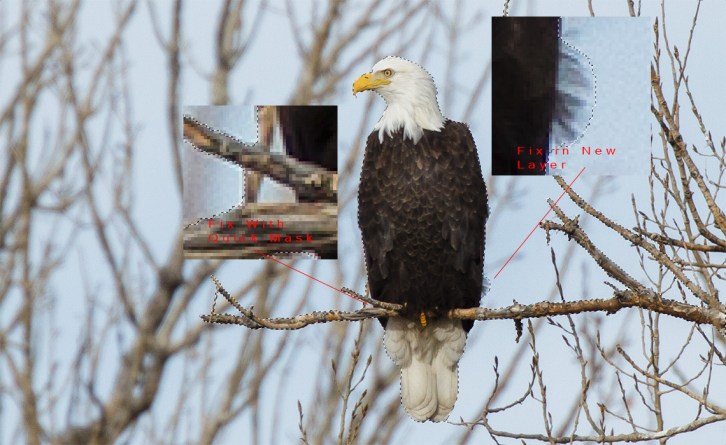
The content generated by CAF is cloned and sometimes modified content from other areas of the image. It will not look perfect initially, so we will need to clean it all up. For the most part, blurry background content is ok if it does not look perfect…we are going to blur that anyways and make it less defined, so the only content that really matters is the unsightly foreground detail and any foreground detail that was replicated as part of CAF. We will use the content-aware Spot Healing Brush, Healing Brush, and Patch tools to clean up the image above. The patch tool in content-aware mode is useful for initially cleaning up large areas of content, such as the protruding foreground branch in the lower center of the frame. Select the area to be patched, then drag that selection to another area of the image….preferably one that has as closely matching content as possible for the area you are patching. It is best to keep the patch area as tight as possible, and not too large (too large, and the content generation algorithm seems to do a progressively worse job).
In areas where there is a clean backdrop behind foreground content to be eliminated, the healing brush in replace mode, sourced off part of the clean background, will make quick work of the foreground content. In areas where there is no clean backdrop behind foreground content, the spot healing brush, or the healing brush in normal mode sourced off of closely matching background content is the easiest way to clean up. Be careful about large swipes, or using large brush sizes, as these will often just create blobs of smooth content without the kind of moderate structure and detail you’ll need. The image above demonstrates a fully cleaned background.
TIP: I can be helpful to toggle the foreground subject layer on every so often, and see if there are any artifacts where the CAF in the background interacts poorly with the foreground. Some slight content-aware spot healing or healing brush is usually enough to correct such issues.
Phase 3: Blurring the Background and Finalizing
There isn’t much left to do. We are down to the last couple of steps…blurring the background and tuning the foreground layer to blend as nicely as possible. Blurring the background is fairly strait forward. You just need to apply a Gaussian blur of sufficient strength to eliminate the chaos of the background, without blurring it so much that it looks unrealistic. This is somewhat a matter of taste, and somewhat a matter of just going with what looks best. It also helps to maintain consistency with the foreground subject if you add just a touch of noise. Again, it is best to eyeball this with the foreground layer visible, and tune the amount of noise to eliminate a background that appears too smooth and soft, but not noisier than the foreground.

Finally, enable the foreground layer and switch to it for final tweaking and tuning. When cutting out a foreground from a chaotic background, you will often end up with halos and false shadows. In the case of this Bald Eagle, there was some haloing around the beak, false shadowing around the upper and back side of its head. Light touches with a very soft erase brush on the foreground layer are usually enough to clean this up. Additionally, look for discrepancies or small bits of background content that shouldn’t be present in the foreground. In the Bald Eagle photo, there were a number of bits of background content around the branches of the perch. A few dabs with a hard erase brush on the foreground layer are usually enough to clean this up. Sometimes blurry near-foreground content will intrude on primary foreground content. The result is usually a lessening of contrast, as near-foreground content is usually indistinct and largely transparent due to blur. Sometimes a few applications of the sharpening brush will correct this, however if the loss of contrast is too great, masking off the area and adjusting global contrast with the Adjustments->Brightness/Contrast tool is sometimes necessary.
Finally, I copied the foreground layer, and applied a sharpen filter to the copy. You could use Unsharp Mask or Smart Sharpen for the final sharpening pass. If you have more advanced tools, such as those from Nik or Topaz, you could apply those instead of a basic PS sharpening filter. It is best to copy the foreground layer, in case you do not like your edits and wish to undo them (which simply required toggling the copy off, or deleting it.) In the final image above, I used Nik Dfine to sharpen the foreground layer.
NOTE: It wasn’t until I was half-way through writing this article that I realized I was editing a scaled and cropped image. As such, the results are not actually as ideal as I had hoped they would be, as I was working with an image of considerably less resolution than the original. As a final note, always remember: Create a TIFF copy of your original photo, and edit that! Do this kind of processing on a full resolution copy, rather than a cropped and scaled copy, to maintain maximum definition and accuracy.
2 Comments
Comments are closed.

Terrific tip for getting rid of the distracting tangle. The clarity and the feathers layers of the bird are just beautiful and so nice to be able to see that without the clutter.
I’m glad you found it useful. 🙂 It really does help your main subject stand out when you can blur out the background and eliminate clutter. Even when you have the benefit of using a very nice, expensive lens that is normally capable of blurring out the background (the Eagle photos were taken with the $11,000 Canon EF 500mm f/4 lens), sometimes circumstances just don’t lend themselves to it in-camera.