Getting Started with Astrophotography


I am often asked the question: “How can I do astrophotography!?” in enthusiastic comments to the images I share online, or when chatting with other photographers in the actual world (yes, there is such a thing as an actual world with actual, physical people. ;-)) For such a simple question, the answer can be incredibly complex. Astrophotography is as varied in it’s forms as “regular” photography, or as we astrophotographers put it, terrestrial photography. In this initial introductory article, I’ll introduce you to the various forms of astrophotography, from the most simple to more complex forms. I’ll leave detailing how you can get into each type of photography for other articles in the future, where I can provide more detail.
So, how do you get into astrophotography? You can start very simple, or you can start out with as much complexity and varied types of equipment as you want. If you have never done astrophotography before, are not mechanically inclined, are not mathematically inclined, or just want to take pretty pictures of the night sky, there are a number of ways you can get into the hobby very simply. If you are already a photographer, with a DSLR or mirrorless camera with interchangable lenses, and have one or more wide angle lenses, you can probably get started with the equipment you have. Wide angle astrophotography is the easiest way to get into the hobby, is the most forgiving form of astrophotography, and generally the most cost effective (as it can often be done “for free” by using existing gear.) For anything else, you will likely need some kind of additional equipment, and the complexity of the hobby grows as you get into narrower and narrower “fields”.
The Field
The “field” is a key term in astrophotography, referring to the framed field of view. You have your ultra wide field, wide field, and narrow or “deep” field astrophotography. The wider you go, the easier astrophotography is, requiring less and less specialized equipment. The narrower you go, the more difficult astrophotography becomes, requiring more and more specialized equipment. This is due to the nature of the night sky…while at times it may seem still, the stars and the nebulas and galaxies among them are constantly on the move. They slide past overhead at a very slow rate, a rate kept in sidereal time. The narrower your field, the more your magnifying a given region of the sky, and the faster stars will appear to move across the field. With very wide fields, the stars may not appear to move at all for very lengthy periods of time, as much as 30-45 seconds. With very narrow fields, the stars may enter, transit, and exit the field in mere seconds or less. As such, as your field narrows, the necessity of tracking will increase, and as it continues to narrow, the necessity of having accurate, reliable, stable tracking will become ever more important.
“Night Sky” Astrophotography
The simplest forms of astrophotography are ultra wide field “night sky” imaging. This includes your Milky Way imaging, your Star Trails imaging, and your Meteor Shower imaging. These forms of astrophotography have the lowest barrier to entry, requiring your average photography equipment, a stable tripod, and an intervolometer or some other way of taking long, hands-free exposures. Wide field night sky imaging is often an extension of landscape photography, frequently involving the use of foreground silhouetted of trees or landscape forms, light painting of foreground and midfield terrestrial objects and landscapes, etc. as ways of augmenting the actual sky image itself. There are a very wide range of techniques on the subject of night sky imaging, and for the most part, I’ll leave it to those who have greater expertise in these areas to instruct you, as there are many brilliantly talented night sky imagers with truly amazing milky way and star trails photography online.

Solar System Astrophotography
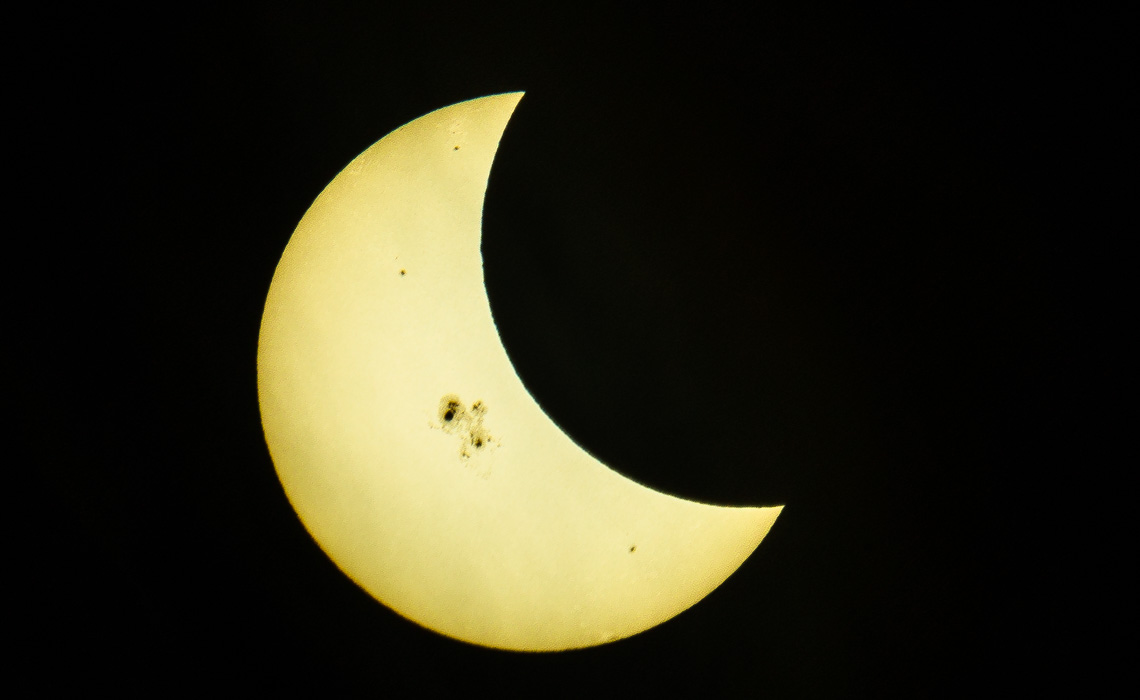
Another form of astrophotography that has a lower barrier to entry is Solar System imaging. This includes your Lunar imaging, your Solar imaging, and your Planetary imaging. Lunar imaging is probably the easiest form of what most might consider “real astrophotography” to get into. In it’s simplest form, all it requires is a tripod, a DSLR or mirrorless camera, and a relatively long telephoto lens of about 300-400mm or longer. The moon is a bright target, requiring short exposures, often as short as 1/100th of a second, and rarely longer than about 1/3rd of a second except in the most extreme thin crescent phases. The moon is an intriguing target, with varied surface detail, and about thirty ways to image it every month. 😉 Solar imaging is a bit more complex than lunar, requiring slightly more specialized equipment, and specifically more care for the imager’s health and safety (as well as the safety of your equipment.) Some kind of heavy duty solar filtration is required with solar imaging, however that is fairly easy and relatively cheap to acquire, as easy to use, rubber-band-it-on solar imaging film can be found via a number of online stores, including Amazon.com, as solar film, solar filter, or safety film. With proper filtration, a considerable amount of surface detail, sunspot detail, and possibly (with more extreme filtration or specialized telescopes) even solar prominences, flares, etc.
Planetary imaging has a slightly higher barrier to entry than lunar or solar, largely because of the required magnifications. Planets, while generally larger than stars, are still very tiny objects. The average terrestrial prime telephoto lenses top out at around 800mm, and with teleconverters can reach as high as 1200mm (i.e. 600mm f/4 + 2x teleconverter, for 1200mm f/8). Such lenses are usually quite cost prohibitive, and well out of reach of most imagers. Longer lenses like that which are within the budgets of midrange photographers, like the Tamron 150-600mm, will usually not support a 2x teleconverter. Even assuming getting 1200mm worth of focal length with a camera lens was within your budget, it is generally just not enough. You might get some planetary phase detail on Venus, but that’s about it. When it comes to planetary imaging, your looking at 2000mm as a bare minimum, with 3000-5000mm more common, and as much as 10,000mm if you really want to get high detail, high resolution results. Planetary imaging is also a form of lucky imaging, and usually requires a camera capable of recording at very high frame rates. Despite these requirements, planetary imaging is still one of the more cost effective ways to get into astrophotography, and has a lower barrier to entry. If you are already an astronomer, and have some kind of longer focal length reflecting telescope, or a high magnification refractor, you can get started with a barlow and a high speed imaging camera, which cost a few hundred dollars. Also despite the long focal lengths, which implies narrow fields, tracking does not have to be as stringent with planetary imaging, and you can get away with poorer tracking, and thus cheaper mounts.

Deep Sky Astrophotography
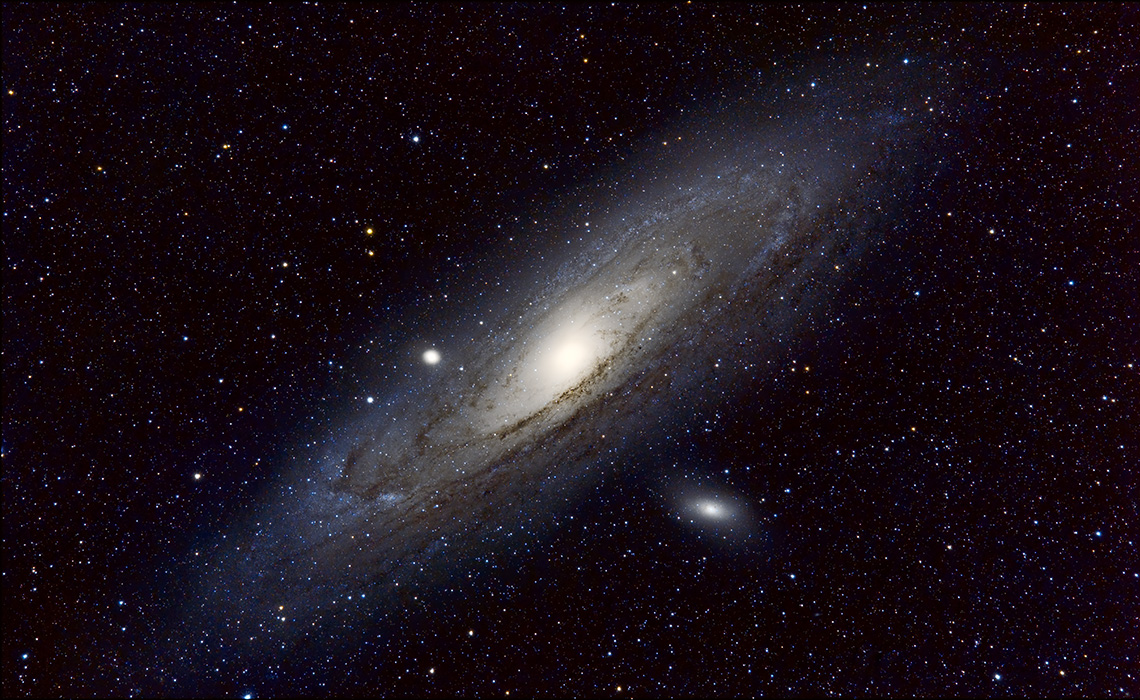
Imaging beyond the solar system is where astrophotography really opens up, and the possibilities are nearly endless. The deep sky is where stars, star clusters, nebula, and galaxies exist. These objects can often be gargantuan, and sometimes extremely small. Sometimes large swaths of sky are filled with beautiful hydrogen, oxygen and sulfur nebula, and you will want shorter focal lengths. Other times, thousands of distant galaxies may pack themselves into an area 1/10th the diameter of the moon (or less!) And a whole range of objects filling the various sizes inbetween can also be found. Object brightness tends to be considerably lower than with planets or the moon, and long exposures as well as gathering many individual exposures are usually required. Having decent tracking at the very least, as well as decent sensor resolution, and good quality optics, become more important when imaging these objects.

Imaging deep sky objects (DSOs) is usually where you will find the need to spend at least a couple thousand dollars on a decent mount, a decent telescope, and at the very least an “astro modded” DSLR (a camera more sensitive to the red end of the visible spectrum than your average camera.) Used gear can lower the barrier to entry here, and there is usually plenty of used gear on the market. Still, one must expect to spend at least $1500. Camera lenses can be used as telescopes if they are long enough, however most telephoto camera lenses do not actually offer the necessary optical quality for astrophotography (even if they are excellent performers for terrestrial photography.) This part of the hobby is often referred to as the black hole, as the sky is the limit as to how much money can, and probably will, be spent purchasing ever better, more precise equipment to track the sky more accurately once the “bug” gets you.
To Track or Not To Track
The biggest early decision you will have to make when you start getting into astrophotography is whether you want to track or not. Tracking the sky is essential for most forms of astrophotography, and finding the right mount for your needs, especially for your capacity needs (in terms of weight put on the mount by equipment), is going to be one of the most important decisions you make. Some forms of astrophotography, namely the ultra wide field stuff and possibly some planetary stuff, can be done without active tracking. Star trails in particular actually requires no tracking at all, just a fixed tripod. Most wide field milky way stuff can be done without tracking, although tracking and some clever processing techniques can actually improve results even with images with such ultra wide full-sky fields. Everything else will require some form of tracking. So, if your interested in anything narrower than the entire sky and want to get into astrophotography, be sure to budget at least some money for a mount of some kind. That may be as little as $500, and as much as a couple thousand dollars or so (for entry level/lower midrange mounts.)

There are ways to get into tracked astrophotography on the cheap. The cheapest form of tracking is probably a DIY “barn door” tracker, and these are usually little projects you can build at home with scrap (or very cheap) parts and a little bit of handiwork. A barn door tracker will get you started, but it’s about as minimal as tracking gets and will only take you so far. It might be a fun project for those so inclined and with the necessary skills, but there are lower cost tracking options that will do much better, and actually allow pretty good tracking for more wide field stuff (say up to 100mm or so lens on a DSLR or mirrorless, which isn’t the whole night sky, but a big chunk of it.) These kinds of tracking mounts include the iOptron SkyTracker or Vixen Polarie, both of which fall into the same general price range of $400-600 or so (depending on options). There is also AstroTrac, which for a full setup is closer to a grand, although ironically that is still well on the “cheap” end of things. These trackers are a great way to get started without spending thousands of dollars on the hobby, and if you stick with the learning curve, you can produce some amazing images with them.
Equatorial Tracking Mounts
If you wish to use a telescope or even camera lens longer than a couple hundred millimeters focal length, then you should really consider an equatorial tracking mount. Often called GEMs, or German Equatorial Mount, these provide the most accurate tracking, fast and accurate pointing to anywhere in the sky, the ability to be guided for precision, etc. If you wish to use a lens longer than around 400mm, an equatorial mount is going to be essential, if nothing more than from a capacity standpoint. The small mounts noted above, like the SkyTracker, cannot handle much weight, and the more wight on a mount, the worse the tracking is likely to be. There are several ranges of equatorial mounts, ranging in (new) prices from less than $1000, between $1000 and $2000, from $2000 to about $6000, and from $6000 and up. These price ranges roughly correspond to your entry level, lower midrange, midrange, and high end mounts. High end mounts used to start at around $10,000, and could easily baloon in cost to tens of thousands, depending on the kind of capacity you needed. Recently, there have been more higher end, high quality mounts with high tolerances and very precise tracking reaching the $7000 mark, which is just barely above the cost of many midrange mounts which just don’t compare in terms of precision, accuracy, or overall quality, and may change the game for the midrange mounts that cost about $5000 or so.
These price ranges also roughly correspond to capacities as well. Your sub-$1000 mounts will usually not have rated capacities more than 30lb, your $1000-$2000 mounts usually won’t have rated capacitied more than 55lb, and your mounts up to $5000 might handle up to 90-110lb. There is a bit of a quirk with mounts below the “high end” range, in that rated capacities are for visual use. Imaging requires considerably tighter performance, and as such, it is considered that the ideal imaging capacity is about half the rated capacity, and highest effective imaging capacity is at most two thirds the rated capacity. That puts the capacities of these mounts at around 15lb for your entry-level mounts, 20-30lb for your lower midrange mounts, and 40-60lb for your upper midrange mounts. There is one particular exception to this rule, Losmandy mounts, which wile not engineered to the same quality as a true high end mount, are generally engineered better than most other mounts with a possible exception or two. Losmandy mounts have higher rated capacities than most others, so their imaging capacities are also higher (and you can usually push them to the 2/3rds capacity mark a bit easier.) Losmandy mounts also tend to cost a notch up from the rest, but are still some of the best options for their capacity ratings in the current market.
Most beginners won’t need to worry so much about the capacity. You’ll likely be using gear that is 15-20lb tops, so an entry level mount will usually do, and if you decide you really want to start out with something heavier, a $1500 mount like the well regarded Orion Atlas will usually do. Also remember that there is a good market for used astrophotography equipment, and most of the mounts in this range can be found for less than $1000. The Orion Atlas itself can often be found for as little as $650 if you keep an eye out for a great deal, which is barely more than a SkyTracker or Polarie. The Orion Sirius can usually be found used in the same price range. (If you are in Europe, the equivalent mounts would be the EQ5/HEQ5 and EQ6, which are essentially the exact same things as the Sirius and Atlas in the US.) So, at the very least, expect to spend no less than $500 on a mount, likely as much as $1500 if you buy a new Atlas, or somewhere in between if you buy something used. This is an essential cost for anything other than wide field, and buying the right mount is key. I’ll have another article on how to choose the best mount for your goals in another article soon.
Options for Optics
Another important decision you will make is what kind of optics your going to use for your astrophotography. You can use camera lenses, although over the long term, you will likely find that most camera lenses are actually woefully insufficient for quality astrophotography. Camera lenses are generally the only, and desired, option for ultra wide field stuff, and even standard wide field imaging with lenses from 50mm up through about 200mm or so. Paired with a SkyTracker, Polarie, or AstroTrac, and a DSLR with a 50, 85, 100, or 200mm lens can be a powerful combination for creating amazing wide field night sky vistas. For most other things, a proper telescope is generally going to offer the best quality, and there are other reasons to get a true telescope as well. I’m going to detail the options here, and some of this might go a little above your head, but bear with me for now.
Refractors
There are several kinds of telescope designs. There are telescopes built like camera lenses, with optical glass elements, called refractors (refracting telescopes). They are usually simpler in design than lenses, they are never zoom, have less glass overall (which is good for image quality, the more glass in a lens or telescope the harder it is to maintain control over the aberrations each one can introduce), have no controllable aperture or focusing mechanisms, and as such will usually produce better image quality with tighter stars than the majority of camera lenses. Refractors can be made in a wide variety of focal lengths, from ultra short (the 300mm range) to very long (over 1000mm). Refractors are also simple to design and construct, and can be quit cheap as a result (although there are also very expensive refractors when you get into those with larger apertures and longer focal lengths.) Beginners will usually be safest starting with a refractor, and the cost barrier is quite low with the shorter focal lengths, making them an even more appealing option.
Reflectors
There are also your reflecting telescopes. Unlike refractors, which use glass lenses to bend light, reflectors are usually lens-free. Instead they use mirrors of various designs. While reflecting telescopes are not aberration-free, they do not suffer from some of the more frustrating kinds of aberrations that refractors often do (particularly cheaper ones), such as chromatic aberration. Another benefit of a purely reflecting telescope is they do not filter out or bend to a different degree any light, including non-visible forms of light (or em radiation) such as infrared or ultraviolet. Some imaging applications make use of parts of the near infrared spectrum, which with optical glasses usually focuses at a different point than visible spectrum light (same thing as chromatic aberration), and a reflecting telescope will focus all the light to the same focal point. Newtonian telescopes, which is probably one of the more famous telescope designs, is a reflecting telescope that makes use of two mirrors, a parabolic primary and a flat, angled secondary near the top end of the telescope. Newtonian telescopes are a very simple design, and one of the most effective ways to get lots of aperture (more on this later) at very low cost (as little as a few hundred dollars, usually less than a thousand for as much as 10″ of aperture, which is quite significant.) The very simple design of a newtonian also brings with it a consequence: coma. The corners of the field will suffer from a type of aberration that makes stars look kind of like tiny comets. There are ways of dealing with this, and more serious imagers usually will…however the very low cost of a newtonian is often enough to offset the issues for beginners.
There are also Ritchey-Cretien (RC) telescopes, which employ two hyperbolic mirrors in a design more ideal for use with imaging for good cost, although usually a bit more than newtonians. There are a number of companies reselling Ritchey-Cretien reflecting telescopes for amateur astrophotography, and these have become quite popular in recent years for their compact size, overall good image quality, and excellent cost (a 6″ f/9 Astro-Tech RC can be purchased brand new for $400, for example…which is near the bottom end of the cost spectrum for all telescopes, including refractors.) The most popular RC’s are the 8″ ones sold by Astro-Tech, TPO and GSO, which is less than a grand.
Another reflecting telescope design is the classic Cassegrain. This is another purely reflecting telescope, however classic cassegrains are usually not used much today due to the fact that they suffer from a variety of aberrations. The Ritchey-Cretien design is actually a form of cassegrain telescope, however it uses a slightly different mirror design to correct for the coma, producing better stars closer to the edges and corners of the field.
Combinations
Finally there are telescopes that combine reflecting and refracting optics to produce a more ideal balance between size, weight, cost and image quality. These include your corrected cassegrains and other telescope designs that employ small amounts of corrective optics in combination with various kinds of mirrors. Some of the most popular telescopes with such designs include the Celestron or Meade Schmidt-Cassegrain Telescopes (SCTs), two brands most amateur astronomers should be familiar with. These companies both have versions of their SCT telescopes with “aplanatic” designs which eliminate distortions that occur as you move towards the outer regions of the field. This is an important trait for astrophotography, which due to use of a flat sensor, will show increasing distortion of stars the closer to the edges and corners of the frame you get unless you have a “flat field” (more on this in future articles.)
There are other kinds of telescopes that combine mirrors and lenses in addition to the SCT. These include Maksutov designs, such as the Maksutov-Cassegrain & Maksutov-Newtonian, Corrected Dall-Kirkham, and a variety of other designs. Mak-Newts are a basic corrected version of the newtonian, usually more costly which takes away a lot of the advantage of a newtonian telescope (which are frequently less than a grand for as much as 10″ of aperture). Corrected Dall-Kirkham (CDK) telescopes offer some of the best image quality at the best price points today, however those price points are still usually quite high (tens of thousands). A corrected Ritchey-Cretien can cost around $40,000 to $50,000 for 20″ of aperture, whereas a CDK of the same size might cost $32,000 or less. These telescopes are not for your basic amateur, however very serious amateurs will usually choose some kind of high end or corrected RC, or a CDK, with a large aperture of 20-24 inches, to produce some of the worlds best high resolution amateur astrophotography today.
Aperture
You will often hear about aperture once you get into astrophotography. Aperture is both very important, and not important at all. Yes, I know, confusing. 😉 It’s actually very simple. For you as a beginner, aperture is not important at all. I know of many beginners or first-year astrophotographers who are using very small (on a relative scale) refracting telescope to create truly amazing images. Part of that is because a small, short, light-weight telescope is just easy to manage, and as a beginner, easy management of your telescope is one of the most important things for early success. Over the long term, if you stick with the hobby, you may find that you want a larger telescope, however by the time you start thinking about upgrading to a bigger scope, you should start to understand the value of larger apertures…at which point aperture’s importance will assert itself. Until that time, aperture is one of the less important things you, as a beginner, should concern yourself with. The likelihood of buying more than one telescope over your time as an astrophotographer is also one of the reasons why buying the right kind of mount is more important than buying the right kind of telescope. You will often hear in astrophotography circles that “the mount is the most important thing”…a very true statement.

As a beginner, a refracting telescope with an aperture somewhere between 65mm to 80mm, with a focal length somwhere between 300mm and 800mm, is going to be the easiest thing to get started with. There are many such refractors on the market that fall within those ranges, at a range of price points from a few hundred dollars to a couple thousand dollars. Somewhere in the middle of the price range is where you will find the most ideal telescope, with the most ideal aperture, to get started with…if you start with a refractor. The benefit of finding a shorter telescope with an aperture in this range is that it will put minimal strain on your mount…and on you…from a tracking standpoint. You will not need to achieve highly precise tracking, you will be able to handle wind pushing on the mount and scope better, you will be able to get longer exposures with fewer problems. This is the primary benefit of a short refractor.
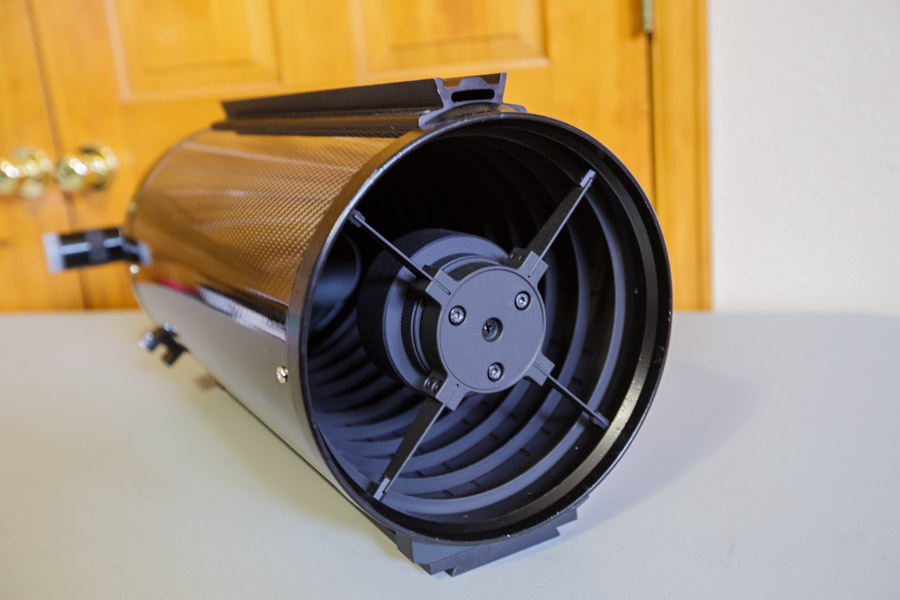
Another good beginner telescope would also be a small newtonian. Something with a 6″ aperture (which, to put things in perspective relative to the refractors, is a 150mm aperture) will give you a fairly small sized telescope (although a fair bit larger than a short refractor.) The big aperture, at a “fast focal ratio of f/4 or f/5, will guzzle down light, which will allow shorter exposures. Short exposures, much like small size, puts fewer demands on the mount and on you when it comes to tracking precision. That makes a fast newtonian another great way to start. The other benefit with a newtonian like this is they can usually be purchased new for a few hundred bucks, even cheaper if bought used. That greatly lowers the barrier to entry. The big caveat with a newtonian is the fact that they require collimation…something refractors do not require. Collimation is an added complexity, and not everyone takes to collimating easily, so it is something to consider. There is also the coma issue mentioned above to deal with, however there are ways of correcting that, and for a beginner, the coma issue is one that can be ignored in favor of the very low barrier to entry.
Software – Operating, Integrating, Processing
You heard that right, software! Astrophotography is a highly computerized hobby these days. You can completely control all of your equipment from a computer if you wish, and there is software that covers every aspect of operating your setup. Software is also a key component of processing astrophotography just like it is with any other form of digital photography, so at the very least, you will need some kind of program to process your images. It should be noted that processing your astrophotography, unless you are doing basic night sky imaging (milky way/star trails), you will not be able to use standard photography tools like Adobe Lightroom or Apple Aperture for processing. You will likely need Adobe Photoshop at the very least, and there are other programs for performing pre-processing and image integration, processing lunar and planetary images, etc.
First off, for the most basic use case: Milky Way and star trails imaging. These are probably the only two forms of astrophotography you could get away with using something like Lightroom to process. Milky Way images can often be created from a single frame, and they can be processed similarly to terrestrial photography. Star trails, by their very nature, require stacking of some kind, usually not possible in Lightroom, but preprocessing of each star-trail frame could be done in Lightroom. To really get the most out of either form, Adobe Photoshop is recommended, or something similar. I don’t generally recommend anything else these days unless you insist on using Linux, in which case your kind of on your own for finding software. 😉
For those using Windows or Mac, Adobe offers a $9.99/mo Photographers package for their Creative Cloud. This includes Adobe Photoshop CC and Adobe Lightroom, as well as the standard online storage features and various free programs offered as part of Creative Cloud. I know a lot of people complain about Creative Cloud…however this deal is truly a steal. Most people spend more than $10 a month on coffee, some people spend more than that every day. Give up a cup of coffee, or whatever that other little thing you get all the time, a couple times a month, and you can easily cover the cost of the Adobe Photographers CC deal…and I highly recommend that you do. Photoshop is a staple for astrophotography processing, and at one point or another you are going to want it at your disposal. There are countless beginner tutorials online that cover basic astrophotography processing, and most of them use Photoshop. Consider it essential software #1.
Operational Software
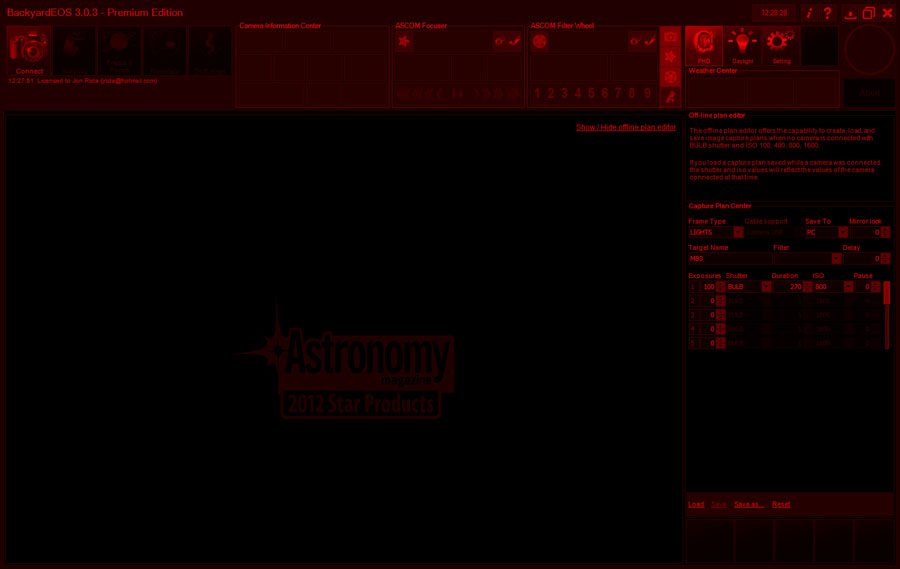
The first class of software often used in astrophotography is the operational software. These are the programs that let you guide, control the mount, program imaging sequences and automate the imaging process, planetarium software to point the mount and scope at your target, and framing, centering, and mosaicing software. Not all of these programs are essential. In some cases, you may be able to image without any of them, which is often the case with ultra wide field imaging, where only the firmware in the camera and possibly an intervolometer are used. Some of this software makes the job of operating your setup easier, however. Many of these programs, such as guiding software PHD2 & Metaguide or plate solving (framing and centering) software AstroTortilla are freeware. Many planetarium programs are free as well, such as Cartes Du Ciel (CDC), Stellarium, or Microsoft Worldwide Telescope (WWT). Other packages are not free. BackyardEOS (BYE) and BackyardNikon (BYN), or AstroPhotography Tool (APT) are not free, however they are fairly cost effective at less than a hundred dollars each. More advanced control programs, like Sequence Generator Pro (SGP), MaxIm DL (MDL) and Nebulosity, or mount management and planetarium programs such as The Sky X (TSX) can be more costly, possibly very costly as in the case of MDL (which runs about $700). There are other automation packages for those who wish to operate their own private observatories that can range in price from a few hundred to a thousand dollars all told.
There are other programs that you may also need, or find a use for, to optimize the operation of your setup. Plate solving software can use star images to figure out, automatically, where you are pointing. They can be used to determine if your mount is properly calibrated, such that when you tell it to point at something, it points at it with accuracy and precision. They can be used to actually tell your mount to slew to a particular target, based on a previous image (say one you took on a previous night, that you wish to recenter and image again on later nights.) There are programs like PemPro that can help you optimize the tracking and polar alignment of your mount, reducing tracking errors and optimizing your results. Some of these kinds of programs are free or cheap, others come with moderate cost. Each is something the individual will need to determine if they need through practice and experience with their own equipment.
Integration Software
The second class of software used in astrophotography is integration software, or more often called “stacking” software. Due to the extremely low light levels astrophotographers work with, noise in the image becomes a very large problem. Stacking images allows you to reduce noise by averaging the data together. Averaging reduces noise by the square root of the number of individual sub frames stacked, so if you stack 4 subs, you reduce noise by a factor of 2, 9 subs reduces noise by a factor of 3, 16 subs by a factor of 4, etc. Stacking software will also usually perform calibration and alignment or “registration” as well. Calibration is the process of removing some electronic & thermal noise, as well as using flat frames to “flatten the field.” Calibration is a key factor in getting good results in astrophotography. Registration is the process of identifying stars in each sub frame, and assigning additional metadata to each one that allows the images to be very accurately aligned so they can be stacked.
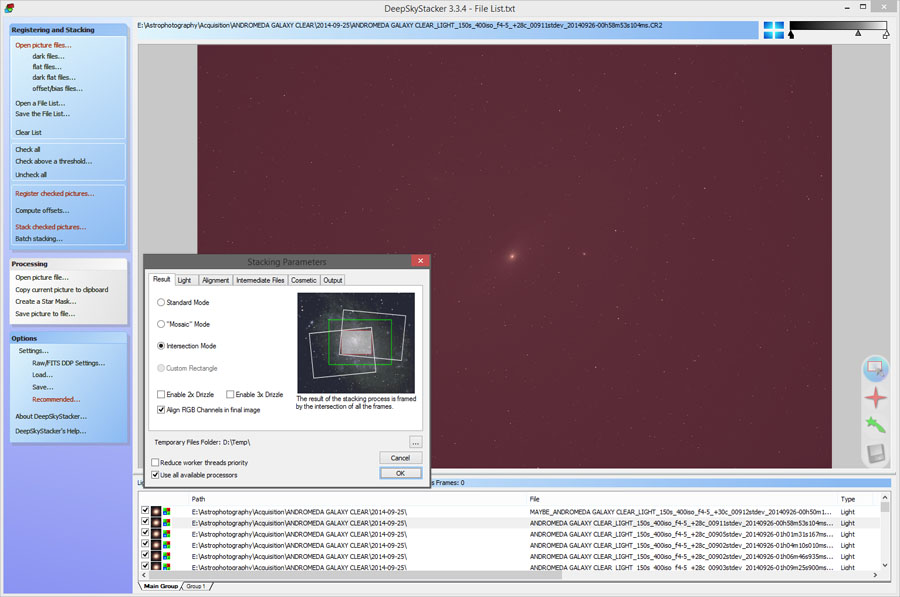
The most common tool used by beginners for this purpose is DSS, or Deep Sky Stacker. It is a free program, very easy to use, and almost entirely automated. DSS will get you good results very easily, and supports full calibration of your images and will automatically calibrate if you supply the right kind of frames along with your “lights” (the sub exposures of the night sky.) There are more advanced tools that support the integration process. Some full package imaging and processing tools like MaxIm DL and Nebulosity, support integration. PixInsight is just a processing tool, however it has very powerful and accurate integration tools. RegiStar is a stand alone and very accurate registration tool, used after calibration and before stacking. As astrophotographers increase in skill, they will inevitably start looking for ways to improve the quality of their images, and moving beyond DSS is usually the first step.
Processing Software
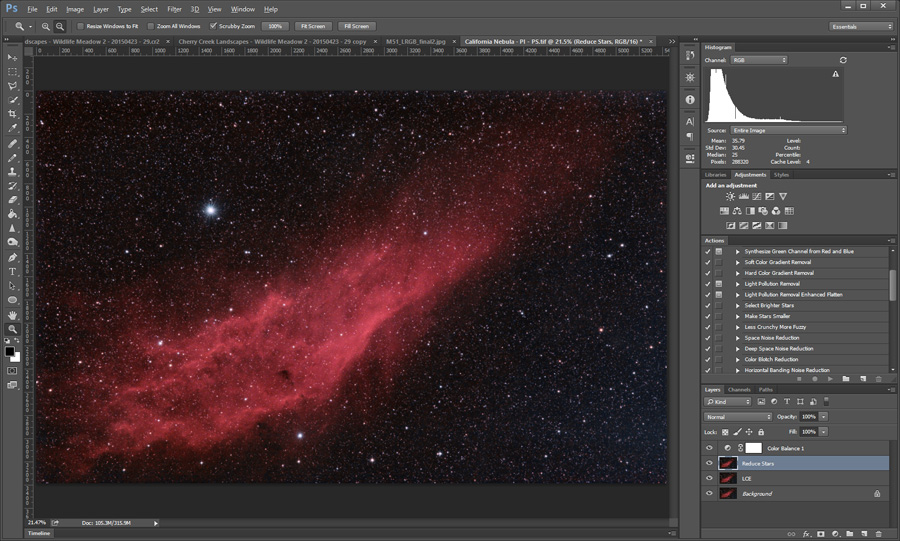
The third class of software used in astrophotography is processing software. Like any photography, to get the most out of your images, you have to process. Processing in astrophotography is a more critical process than in other kinds of photography, requiring some unusual procedures and extensive noise reduction. For beginners and advanced imagers alike, there is one staple program that should probably always be purchased: Adobe Photoshop. Photoshop offers so much in so many ways, it’s tough to do astrophotography without it. Even highly skilled imagers who do most of their processing in other programs will usually end up in Photoshop at some point or another. Photoshop is also an easy way to get started, as there are a few cost effective “action packs” that offer astro-specific processing actions, such as noise reduction, star enhancement, detail enhancement, etc. at the click of a button. One of these is Carboni’s Astronomy Tools, another is Annie’s Astro Actions. There are a number of other critical plugins for Photoshop that every beginner should have, such as GradientXterminator and HLVG (Hasta la Vista Green). Photoshop is the most used image editing program on the planet, and there are countless tutorials online (including video tutorials) covering astro processing techniques. Beginners start here.
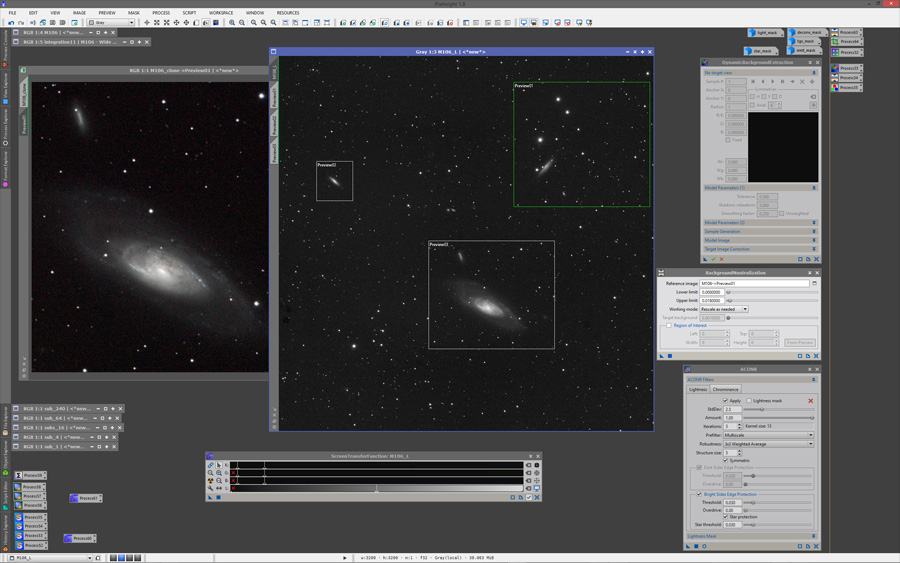
Beyond Photoshop, there are many other programs that can help you process your astro images. My personal favorite is PixInsight. It’s a dedicated astrophotography image processing tool, with a complete workflow that includes all the integration steps, processing steps, and final cleanup and publishing steps (i.e. cropping, rotating, resizing, etc.) PixInsight has garnered quite a following in the astro imaging community, and as such is probably the next best tool from the standpoint of available online tutorials. You can also find a growing base of support in communities like Cloudy Nights Forums. In addition to PixInsight, there are other complete packages, like ImagesPlus and MaxIm DL that offer image processing tools as well.
Where to Start
So, what about that original question that you came here with? How do you get started in astrophotography? Hopefully the above information will give you a base from which to start answering that question. Every individual is going to have to make some decisions on their own, about how they want to get started (i.e. ultra wide field night sky photography, or DSO photography?) and how much they want to spend. That said, there are a few very simple ways to get started on a smaller budget, so here is my baseline recommendation.
You’ve Already Got a Camera
If you already have a camera, then start there. With a DSLR or mirrorless camera, and either wide angle lenses (i.e. 24mm or shorter) or moderately long lenses (85mm to 250mm), you can do night sky/star trails photography (wide) or basic tracked deep sky photography (long). For night sky imaging, you just need a camera that can produce good quality at high ISO (ISO 1600-6400) with moderately short exposures (ranging from 8-30 seconds, depending on pixel sizes), and just a fixed tripod. Find dark skies somewhere away from light pollution, on a moonless night, set up, point at the milky way, and take some pictures.
For deep sky imaging, you need a camera that can produce good quality at midrange ISO (400-1600). You will need a tracking mount, and either a Vixen Polarie or iOptron SkyTracker (with polar finder scope…that’s essential to being able to effectively use these kinds of trackers.) You will need a sturdy tripod to put the Polarie/SkyTracker on. You may be able to get away with lenses up to 400mm, but 85-250mm will get you some amazing wide field views of the night sky, encompassing large regions of the milky way, or large nebula regions like the Cygnus molecular cloud, Heart and Soul nebula, or the Magellanic Clouds of the southern hemisphere if your lucky enough to be down there.
You Don’t Yet Have a Camera
If you don’t have a camera, then you can do the same as the above, however you will need to get some kind of camera. My recommendation is to pick up a used, astro-modded DSLR. You can get either a Canon or a Nikon. Canons are very easy to find, however the Nikon cameras these days actually offer better specs. They have lower noise, both thermal and read, have better natural sensitivity to hydrogen alpha emissions, and Nikon lenses are usually better at the wide angle range. The astro-modded part means the camera had the original filter over the sensor replaced with a different kind of filter, or simply optical glass, which allows more of the red spectrum through. That will enhance the cameras sensitivity to hydrogen-alpha, nitrogen-II and sulfur-II nebula emissions. You should be able to find such a camera for around $400-600.
In either case, whether you started with a camera or not, you should get an intervolometer. This is a simple device that lets you program multiple exposures in sequence with your camera. Some newer cameras have these built in, most do not. They range in price from about $30 to a couple hundred. You want to be able to take dozens of shots at least, if not hundreds. If you get one that lets you program hundreds or thousands of frames, you could also do time-lapse night sky videos, another form of the ultra wide field astrophotography (you can either film the milky way moving across the sky, or you can film your star trails getting longer and longer throughout the night using special processing techniques.)
Dark Skies
Imaging from your back yard will likely be a difficult endeavor. You can find light pollution filters that will help. My recommendation is to get a screw-in IDAS LPS-D1 filter for your lens, which might cost as much as $190 but it’s worth it if you can only image from your back yard. Back yards are going to be very limiting, however, especially for the “wide field” stuff…either ultra wide night sky or images taken with 85-250mm lenses. You can get significantly better results if you visit dark skies, away from the city. An excellent way to get started in astrophotography is when taking a camping trip to some remote state or national park, such as the Grand Canyon. Just set up your equipment before you go to bed, point it at the milky way, take a few test shots and make some adjustments to get a composition you like, then set your intervolometer to take a whole bunch of frames. You can sit out and watch the sky, and maybe repoint your camera to different targets, or just let it rip all night and produce frames for a video sequence.
And that’s that…you just got started with astrophotography!

Is that a Nikon telephoto lens you have on that Atlas mount back there? Maybe it’s a Canon … because I can see the Canon logo there on the end. Or is that white piece some sort of adapter you use to connect the Canon camera you have there to a Nikon telephoto? And the plate … interesting … that’s not a Vixen or Losmandy. Is it something you made up yourself? I see the stack of washers on the end … to level it up? 🙂 I’m pretty sure there might be adapters to connect a CMOS or CCD camera to a Canon lens, right? But are there any that allow connection to a Nikon? Do you have any shots you took with this rig?
Hi Clayton,
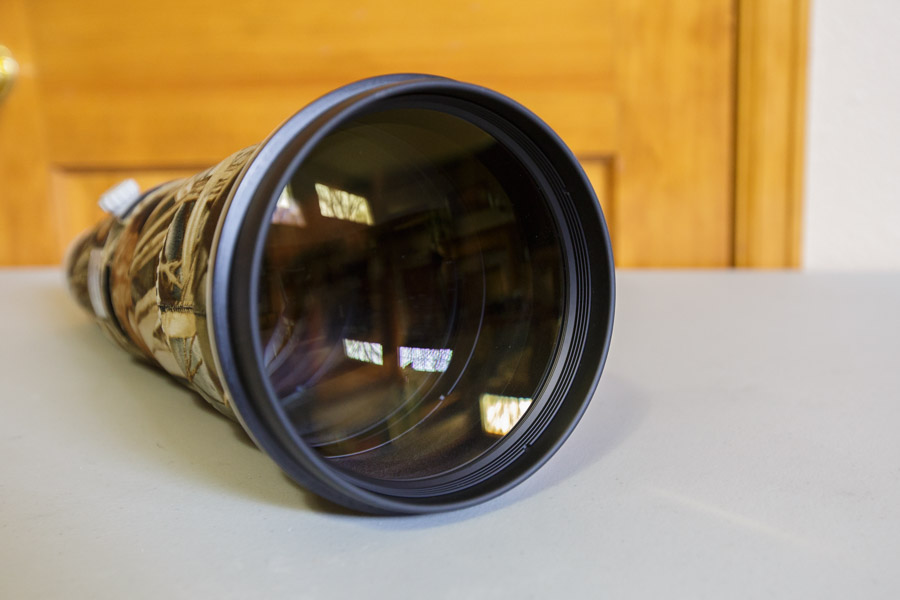
It is a Canon 600mm f/4 lens, with the 2x teleconverter on the back. I do not generally use the teleconverter, it was just there in that particular picture. The main dovetail is a losmandy, the top dovetail is a vixen. The dovetails and the saddle are all from ADM. These days, I use ZWO astro cameras, which have very short backfocus, and are able to be adapted to Canon lenses (which only have 44mm of backfocus) pretty well. They can just as easily be adapted to Nikon lenses…I highly recommend using the Geoptik lens mount adapters…best option out there for tilt-free adaptation. I use an ASI1600MM Cool and an ASI183MM Pro.
This is really Excellent! I’ve been doing astrophotography for about 10 months now and you have hit nearly everything on the head. Your advice is spot-on in every point, I just wish I would’ve listened to everyone’s advice when they said “buy as much mount as you can afford”. Since upgrading last month it has made a world of difference. You are a great inspiration, I hope to be where you are in time as well!
Thanks! Glad you found the article accurate. 😉 Mount is an important piece, for sure. Doesn’t necessarily mean you have to buy the most expensive mount available (as some will say), but a good mount eases a lot of the struggles. Best of luck to you!
Very well written, jrista. I will remember and direct AP newbies here. I am a bit of a newbie myself.
Thanks, Nancy!