Nature Photography
Bird, wildlife, and landscape photography by Jon Rista
Horsehead and Flame Revisited – Ten Months Later, the Journey and the Breakthrough
Happy New Year, readers! It was a good year for my photography. I did not spend as much time seeking out birds and wildlife as I usually do, but 2014 was a year packed full of learning a new form of photography: astrophotography. I’ve loved the night sky since I was a little kid, and for nearly a decade I’ve meant to purchase a telescope. For nearly as long I’ve wanted to do astrophotography as well. Why I did not get into it sooner I honestly do not know, but I am glad I finally did. On February 12, 2014 I put my new Orion Atlas equatorial mount and my 600mm f/4 lens and 7D DSLR to use imaging the night sky. My first image, of the Pleiades, was faint, nearly monochromatic, but I’d finally gotten some starlight on my camera’s pixels:
It’s a simple image, but it had relatively sharp, round stars…something all my prior attempts to image the deep sky with just my fixed tripod had failed to do. I braved very cold weather (sub-zero) and fought limited understanding of how an equatorial mount actually operated, patchy cloud cover, and even some gusts of wind that night, just to get the image above. It wasn’t what I wanted…I’d been drooling over amazing astrophotography for years…but I’d imaged it myself, which felt pretty good (in a frostbitten, bone-chilling and shivvering kind of way… ;P) I took all the data I’d gathered…with astrophotography, you don’t just point at the sky and take a regular old photo, we’re talking about starlight here, extremely dim stuff…and “integrated” it with a program called DeepSkyStacker (DSS). DSS takes all the “light frames”…the colored images of a deep sky object (DSO), and calibrates them with bias, dark, and flat frames, then “stacks” them. This calibration process flattens out the image and removes fixed patterns of noise, and the stacking process combines all the data from each frame together to increase the signal-to-noise ratio (SNR…yup, were definitely going to be eating acronym soup tonight. OM NOM!) of the resulting final image. Increasing SNR is important, as it takes a lot of “stretching”, or pulling up ultra faint detail that usually just looks like black pixels, to reveal the interesting, faint nebula, dust, and galaxies. I was pretty excited when I saw that I’d actually gotten any dust at all in my first image…it was of very short exposures (I think 60 seconds) and there weren’t very many of them in total, so the image had a low “total integration time” (wee’ll…just not give that one an acronym. ;))
Not long after imaging the above, I pointed my scope to one of my favorite constellations, ever since I was a kid: Orion. I pointed towards Orion’s Belt first, seeking out one of the most famous of nebula: The Horsehead. Most people know of it, the black silhouette of a horses head, in this case more the shape of the chess piece than a real horse, framed against a pinkish background of glowing gas. I found it, and was rather ecstatic when I was able to produce a much more interesting image than my first attempt on the Pleiades had produced:

Not much by my own standards today, but back then I was thrilled that I’d gotten so much “detail”…not only was I able to bring out the horsehead itself, but I also revealed Flame Nebula, along with a number of reflection nebula in the same region. A few nights later, I pointed towards Orion Nebula, one of my favorite objects in the sky to observe with my little Tasco refracting telescope as a kid (probably simply because it was one of the very, very few objects I could actually see with that tiny little thing under light polluted skies back then):
Again, I was pretty thrilled at my results. I even applied some “advanced” techniques with my Orion Nebula image, blending in two integrations of differing exposure times, one for the fainter outer dust and another for the bright core or “trap” (The Trapezium, a small open cluster of stars in the center of Orion Nebula). In a matter of weeks, I’d started producing fairly good results, and I was totally, utterly and inescapably hooked. 🙂 I was an astrophotographer, as noobish as I was…and I really was a noob. I made all the classic beginner mistakes, like trying to make the sky totally black, when in reality, the sky is hardly black at all, it’s packed with stars, whispy emission and reflection nebula…and dust. There is dust, all over the place. It’s everywhere, in filaments, in little globules, and in gigantic clouds. Anyway, I digress. People on astrophotography forums seemed to think my images were extremely good for a beginner, but…me being me, the perfectionist…it wasn’t long before I started seeing little flaws that I didn’t like. I’d also been pouring over amazing astrophotography for so many years, while I was exited to be capturing photons at all, I had ambitions. I wanted to go DEEP…to get MORE…more stars, more nebula, more dust…always more dust (I love interstellar dust! :P), more than most other astrophotographers, all but the few greats…and maybe eventually become a truly great one myself.
Nevertheless, I set realistic expectations for myself: Year one, it’s just learning. I decided not to have any major expectations, and I decided not to worry too much about quality over the long run for at least a year, if not two. I needed time to learn. If there was ever a “most complex” form of photography, astrophotography is it. It’s highly technical, detailed, both mechanical and digital, requiring that the photographer learn and understand a wealth of things that the average photographer would never even dream of thinking about. To me, that was highly appealing…I love complicated technical stuff, so it is kind of the perfect hobby for a photographer like myself. One has to understand how to operate an equatorial tracking mount, and once the operation of said mount is learned, then one must learn how to control it.
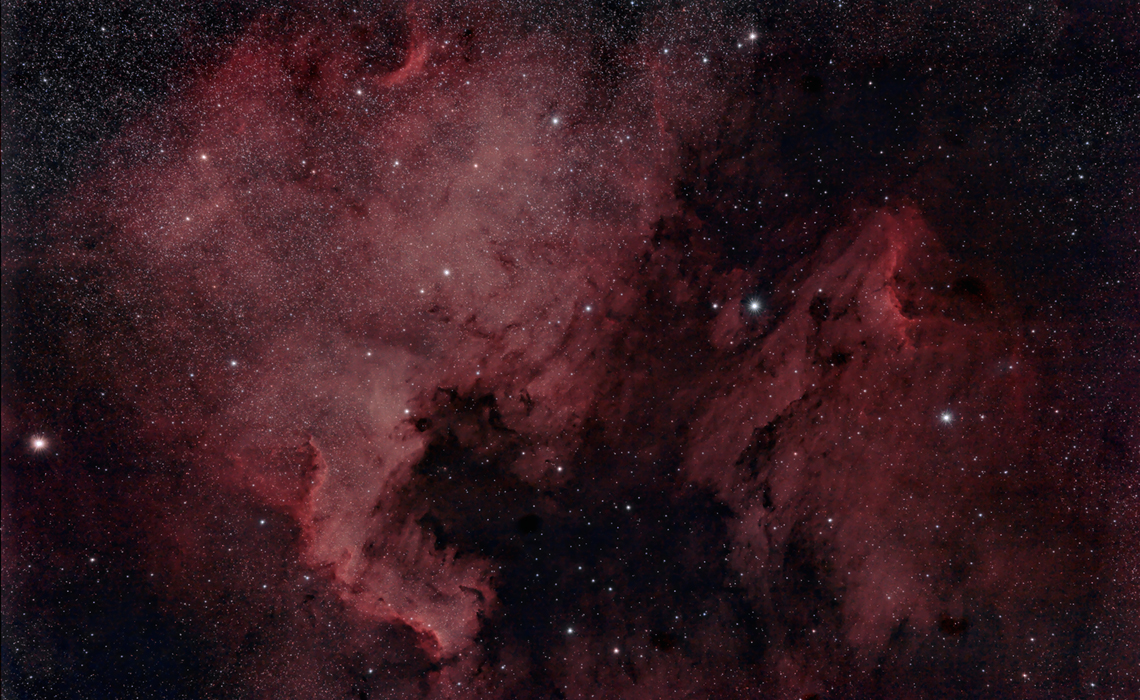
Stars are tiny things in the sky, mere arcseconds in size. While imperceptible to the human eye, your average equatorial mount doesn’t track smoothly…most of them within the range of a few thousand dollars track with “periodic errors” (PE) of 15-30 arcseconds, and lower end ones may have as much as 60 arcseconds (one arcminute) of oscillating error. This error is caused by imperfections and low tolerances in the manufacturing process, primarily in the common “worm”, a helical screw-like gear that actually drives another gear that is attached to the axes of the mount itself. The very, very slight error in this gear can result in a deviation of +/- 8-30 arcseconds. The average star ranges from 1.5 to 2.5 arcseconds in size…so you can imagine, if the mount is tracking so poorly as to add 15-60 arcseconds worth of ERROR to those stars…instead of being tiny pinpoints of light, you end up with large blobs. In the case of high magnitude (very small and faint) stars, they may simply be blurred out of existence, and not show up in your images at all. Bloated stars was often a problem for me during the summer, when I spent the entire time imaging one of the big constellations of the summer skies: Cygnus. Below are North America and Pelican Nebulas. The larger stars show up quite large in my image here, more soft blobs of glowing light than a brighter pinpoint, largely due to the fact that my tracking performance was on the poorer end of the scale.
As a novice astrophotographer, I had to learn to tame the mount. This is done with tuning the hardware, and controlling the error and any “stellar drift” due to slight misalignment on the pole, using software guiding. I spent the majority of the next seven months and change achieving this control. It wasn’t the most fun seven months…I had plenty of problems with my mount. Just learning to keep it all tightly locked together and rigid enough not to shake or otherwise move around as the telescope tracked across the sky took some doing (thanks to a couple quirks about how the mount is manufactured and packed for shipping.) At one point I ordered some parts and “hypertuned” my mount, removing the grease the mount was originally lubed with (barely, in some places) and replacing it with high performance grease. I tightened down all the loose bits, improved the “meshing” of gear teeth with each other to reduce space and minimize gear backlash, and greased up some additional adjustment knobs and bolts that moved poorly out of the box. This improved things a little, but…always striving to do better, I decided to take my tuning a step farther.
One of the reasons I chose an Orion Atlas mount was so I could mod it, as the Atlas was a community favorite, with LOTs of community-provided technical support as well as third party modifications for various things. I chose in October to modify my mount with a belt drive, removing two additional gears that transfer power from the motors to the worms in each axis and replacing them with a belt and pulleys. Gears always have some amount of space between the teeth. In high speed applications, this “backlash” is not much of an issue, however at the extremely slow tracking rates required to counteract the rotation of the earth and point a telescope at one single location in the sky for extended durations, a tiny amount of backlash can be a serious problem. Replacing gears with belts eliminates those sources of backlash. It also results in a more responsive mount, as belts effectively react instantaneously to changes in speed or direction at the motor shaft. Once the belt mod was complete, I finally started to feel as though my mount was working more within my expectations…and after using it for a bit to image a few fall targets, I was satisfied that it was performing quite well.
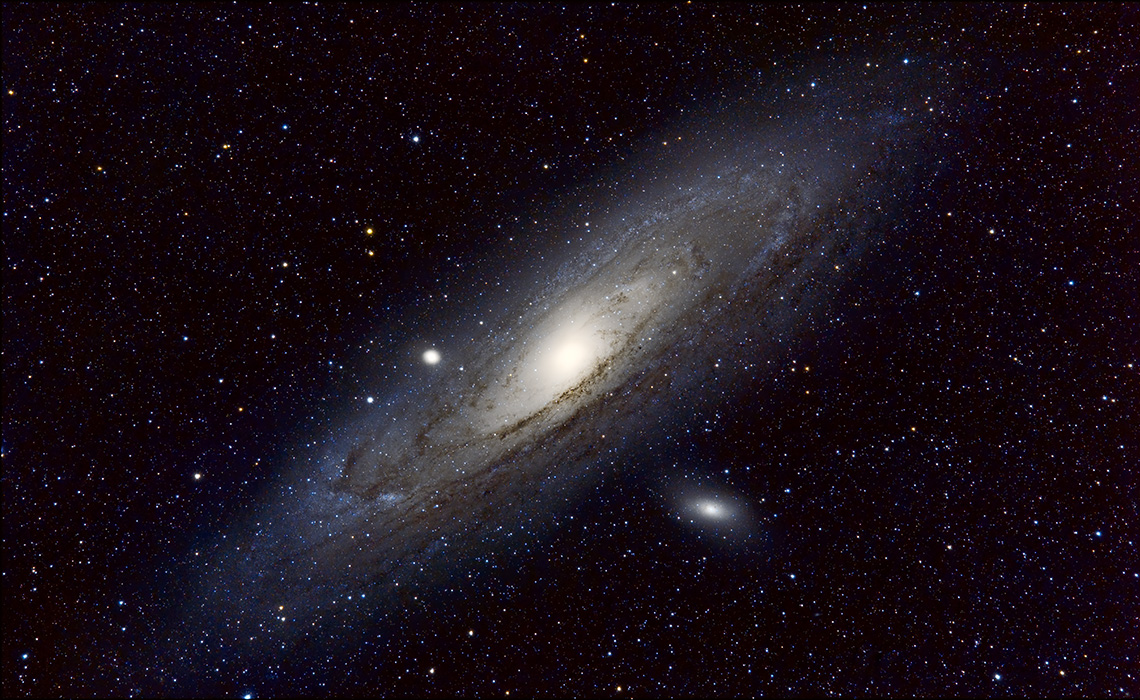
My fall and early winter targets were Andromeda Galaxy, as seen above, and a return to my original target, The Pleiades, as seen below. Andromeda (M31) is an interesting object, for a multitude of reasons. For one, it is both an “easy” and a “difficult” object to image…easy because it’s bright, and just about anyone could get photons onto pixels from it if they barely tried, but difficult because it is so bright, getting the faint outer details can be quite a challenge. It is one of the galaxies of the “local group”, the group of galaxies that the Milky Way calls home. Andromeda is larger than the Milky Way, topping 200,000 light years in size while the Milky Way is only about 150,000 light years or so. Andromeda is an interesting object as it exhibits characteristics similar to our own galaxy. Like the Milky Way, which has three major orbiting satellites…the Magellanic Clouds, two small irregular galaxies within 160,000-200,000 light years, and a gargantuan globular cluster called Omega Centauri…Andromeda also has a nearby dwarf elliptical galaxy (M110) and an orbiting globular cluster (M32). If any beings reside within Andromeda, when they look up at the night sky in our direction, they would likely see something very similar to what we see when we observe Andromeda. Omega Centauri would likely be near the top center right, and the Magellanic Clouds would probably be in a similar location as M110. That’s one of the things about astronomy and astrophotography that fascinates me…that I can look up, and see something a couple million light years away, and almost think I’m looking right down onto myself from afar (we, in the Solar System, would be somewhere between the outer dark dust ring and the inner one…closer to the outer, nestled right on the inside edge of it.)

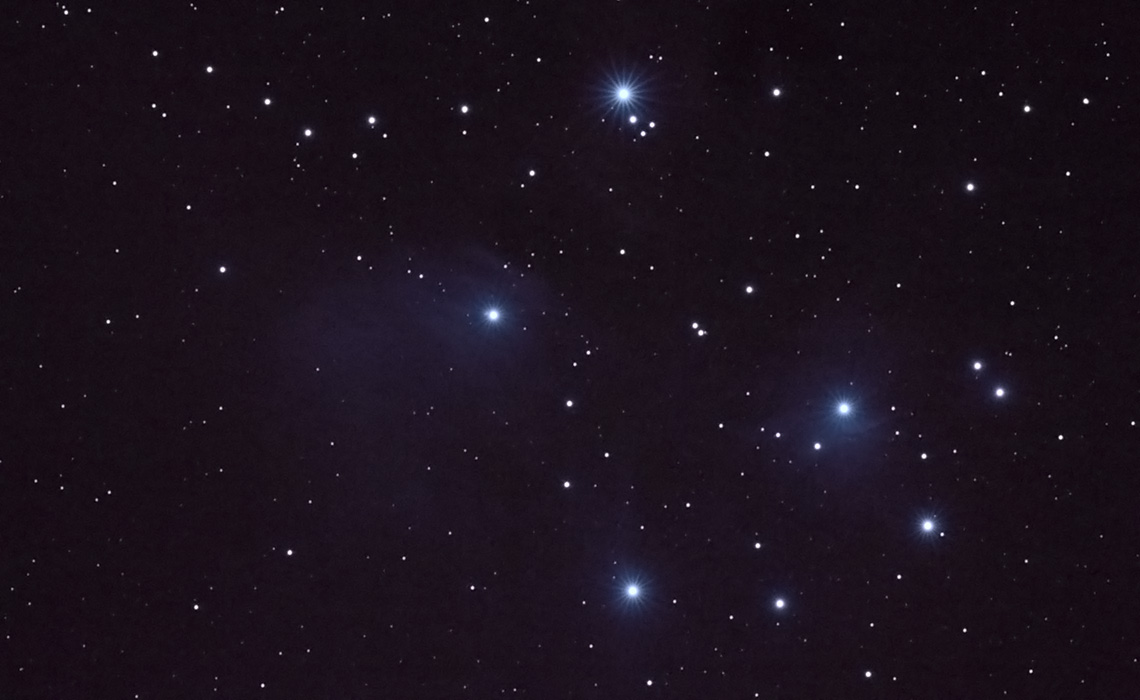
Around the time I started imaging Andromeda, I also started imaging the Pleiades. I was usually able to image both in a night, as any given target is only unobscured in my backyard skies for a short period of time before it slips behind the trees or a neighboring house. As such, throughout most of fall and early winter, I would hop objects throughout the night, starting with Andromeda as it was high early, then jumping to Pleiades later, and possibly even jumping to something else after that. Anyway, back to the Pleiades. Compared to my first attempt, some eight months earlier, the new version is a dramatic difference! All the efforts to tame my mount taught me a lot about imaging, and with the newfound knowledge I had about tracking and imaging, and confidence in my mount that it would perform well enough to simply let the equipment do it’s thing without fiddling (something I was finally able to do around the beginning of October), gave me the freedom to start a long imaging sequence and simply go to bed. By the time Pleiades rose not long after midnight, I could simply point my scope, center, and tell my equipment to gather 30, 40, 50 light frames. I’d then go to bed, and pack up the gear in the morning. After several weeks of imaging both Andromeda and Pleiades, I’d gathered enough light frames to improve my SNR to the point where I could finally start doing what I’d wanted to do all along: GO DEEP!
My new attempt at imaging the Pleiades was quite a success. Instead of barely picking up any of the reflection nebula at all, I managed to go so deep that, when I was integrating all the light frames (of which I’d gathered more than on any other object to that point in time, 225 frames), I noticed that there were extremely faint bits of structure. Structure is a big thing in astrophotography…it’s what were really after when imaging nebula or galaxies of any kind…structure, the features of dust or nebula that give it form and shape. My original goal was simply to go deep enough that I could bring out all the blue reflection nebula around the Pleiades themselves (the Seven Sisters, the seven brightest stars in this image in the group above the two bright ones just below the center point of the frame.) I was surprised I’d managed to get enough exposure depth, especially from my heavily light polluted back yard, that I could see some of the surrounding interstellar dust (or IFN, Integrated Flux Nebula, as it is properly termed.) So, I went after it, dug and processed and dug until I’d managed to reveal the image you see above.
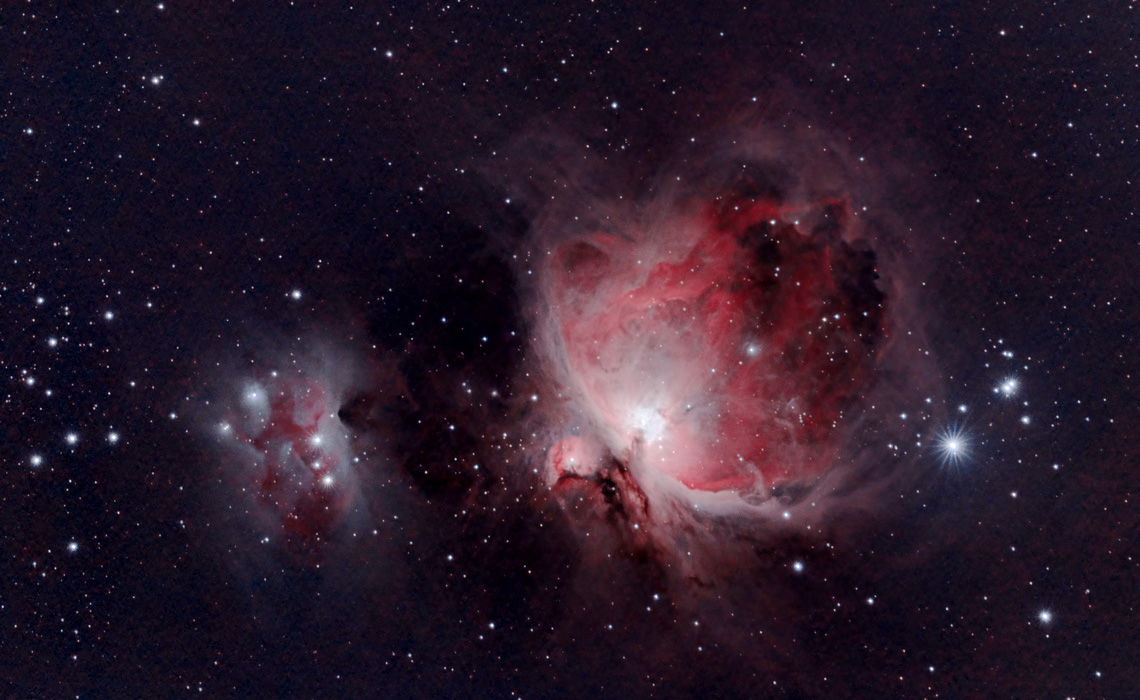
And yet, there was something not quite right with it all. I had to really take the data to the absolute extreme limits to bring out what I did in the image above. It was the most challenging image I’d created, and is probably still at the top of my list of most challenging images. I felt that it shouldn’t be that difficult. I had to reprocess several times before I finally managed to bring out all the structure in the right way. I had to obliterate a lot of finer structure and detail in the IFN to make it show up. I had seen more incredible images of the same region…deeper, more detailed, more brilliant. Something was missing in the way I was doing things, and I couldn’t quite figure it out. By the time I finally created the image above, I was already imaging Orion Nebula again. It felt like I’d come full circle, however it was barely more than 8 months since I’d first started imaging, less than 8 since I’d created my original Orion Nebula image. Thanks to the Pleiades image, I knew that to go deep like I wanted to, to bring out all the faint dusty detail, I needed to get a lot of light frames. At least 200 of them, and at four, give, eight minutes per sub, it was going to take a long time to do so. I started imaging Orion Nebula near the beginning of October, very early in the morning after it rose over my trees. While I waited to gather enough data to do what I wanted, I reprocessed my original Orion Nebula image, and managed to bring out some more faint nebula (as seen above). It was late November when I finally produced the following image:

Like the Pleiades image, I managed to bring out some of the really faint dust, and both Orion and Running Man nebulas were bright and very detailed. I was quite excited about the brightness of the two core nebula, however as with the Pleiades image, I simply wasn’t getting the detail I wanted on the faint outer dust. From the time I started imaging through the end of November/beginning of December, I had been using a light pollution filter. This filter was designed to pass the primary broad bands of light that nebula emit and reflect light in, while blocking the broad bands within which most light pollution occurs…including sodium and mercury vapor lighting (the stuff that lines our streets and highways) and tungsten lighting (the kind of lights we usually light our porches with). The filter mitigated the problems with light pollution, but it presented it’s own. For one, these kinds of filters block a significant amount of starlight, but in an uneven manner that leaves stars with funky colors. The particular filter I was using also had some design flaws that was making things even more difficult, and forcing me to discard parts of my images along the borders due to strange artifacts.
It was around this time, late November, that I was participating in some very interesting discussions with other astrophotographer friends on the Cloudy Nights forums. We were discussing the nature of signal, noise, SNR, and even the nature of noise, the different forms it takes, the things that cause it, how to eliminate it, etc. We derived some complex formulas and came to some interesting conclusions, and we all learned some important things. A particularly knowledgeable member of the same forums offered some related insights about dark skies and the differences between imaging under light polluted skies vs. truly dark skies. I started gathering some statistics about the levels of light pollution in my own back yard, measured the electronic noise levels of my own equipment, and started plugging in these statistics into the formulas we had derived…and I was shocked at what the math was telling me: The mere 200 or so light frames I was getting for my latest images, like Andromeda, Pleiades, and Orion Nebula…was not even close to enough. To improve the SNR of my integrations to the level I’d really need it to be to do what I wanted to do while imaging with a light pollution filter from my back yard, I would need upwards of THREE THOUSAND FRAMES! That simply wasn’t possible…not with the weather we’ve had in Colorado since summer ended, which allowed for two or three clear, cloudless and moonless nights a month at most to image. It would take a many years to get 3000 subs at that rate. Even if I had five clear nights a month and was able to image for six solid hours a night (which is pushing it for my back yard), it would still take over three years!
These numbers convinced me that I had to change the one thing I’d been trying not to change: I had to stop trying to image from my back yard, and find a truly dark site with very dark skies. So, I started looking. I measured the “Sky Quality” of my backyard using a technique from this one particularly knowledgable member of the Cloudy Nights forums. My measurement came out to ~18 magnitudes/square arcsecond (18mag/sq”). Very poor. Almost as bad as it gets. I was scouting around east of Denver, down East Quincy Avenue and off some of the side roads out there. It doesn’t take long once you exit the city on East Quincy to see the difference in the sky…within 15 minutes you can already see more stars, by 25 minutes there are over a thousand stars, and by 35 minutes out the skies are brilliant, the milky way is clearly visible, and a good number of “fuzzies”, largish objects like star clusters, large galaxies, and bright nebula, are also visible to the naked or slightly averted eye. I measured the skies at around 20 minutes out, and again at 35-40 minutes out. The former was around 19.7mag/sq”, and the latter was an amazing 21.3mag/sq”! I’d found my dark site, a mere 35 minutes from my home (when I’d been expecting to have to drive over an hour to find similarly dark skies.) As a reference point, the darkest of the dark skies on earth are 22mag/sq”, and for every increase in magnitude, the skies are 2.5x darker. At 21.3mag/sq” this dark site, at the very east end of East Quincy on a little pullout, was 8.5 times darker than my back yard, and only 1.75 times brighter than the darkest skies you can find on Earth.
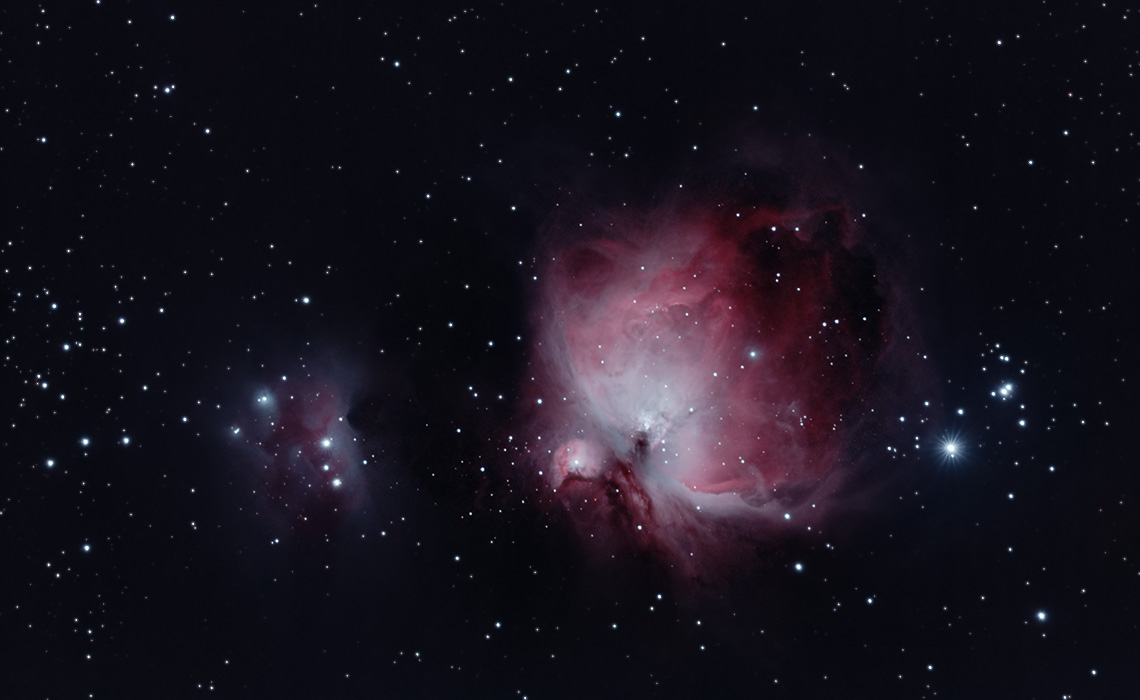
I’d brought my equipment along, so I started setting up. It only took a few minutes to realize that I’d forgotten a key piece of equipment, one of my counterweights. I couldn’t balance my mount, and as such I was unable to do any imaging at this newfound amazing sky. I was a little bummed, but I’d brought along a new pair of binoculars that I’d purchased only a few weeks before. I packed up my equipment, pulled out the binoculars, and scouted out as many objects that I knew about and observed each one for a few seconds. I spotted over 30 objects, which was fairly exciting, however it was biting cold with a slight breeze, and I simply had to pack it in and head back home. That was about a week before Christmas. The next clear night, I headed right back out, to the same location, this time with everything I needed to do some imaging. I spent a solid seven hours out there, again with a slight breeze and bitter cold…however it was worth every agonizing minute! I’d finally broken through a barrier, identified the issue that I’d been seeing, but had previously been unable to really define, ever since I’d started processing the Andromeda, Pleiades, and Orion Nebula images. Light pollution. It’s the true bane of the ambitious astrophotographer, and no amount of filtering, no amount of time, no amount of effort and no amount of sheer willpower is enough to conquer it. One must simply flee from it. Under these truly dark skies, on December 23rd, 2014, I’d finally managed to create something that I felt I could call a masterpiece:

I was ecstatic! Not only that, I finally felt I’d accomplished something significant…more than just solving mechanical or software issues, more than simply no longer struggling to barely create a basic “beginner” image. I’d broken through a wall that I’d felt was towering far, far above me since summer had started, one that I was trying to vertically scale…when the answer was to simply walk around it, as it was only a few feet wide. 😉 I was excited to get into astrophotography back in February. I was excited to get my first images, I had fun, despite the struggles, imaging through the heat of the summer and struggling with my mount’s deficiencies. I enjoyed learning about the mechanics of an equatorial mount, and conquering the limitations of a cheap, low end mount. I gained a LOT of knowledge through all those frustrations and struggles. But I was never really satisfied with anything I’d actually created until I created the image of Orion’s Sword above at a dark site, without any filtration, and in a mere 2hr 20min! Deep, dusty, clean & brilliant. And appropriately colored, the stars, the nebula and the dust. The day I created the image above was the day I felt I finally became an actual astrophotographer, instead of simply a guy with aspiration of becoming one.
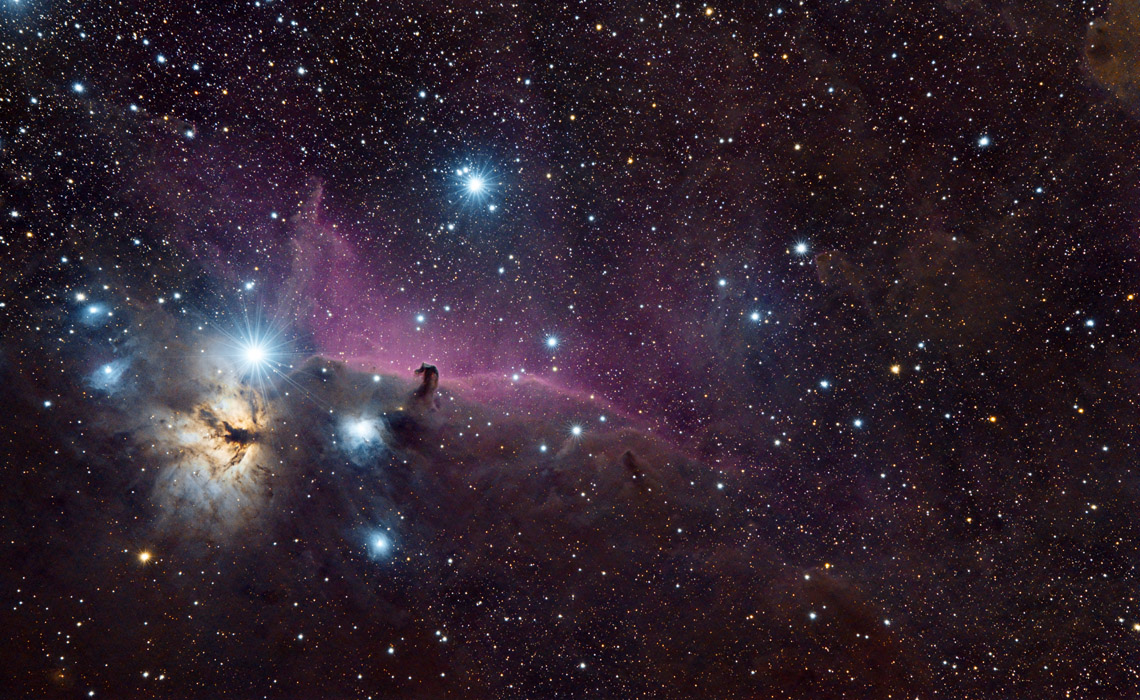
I visited the same dark site again, the night after Christmas. On December 26th-27th, 2014, I proved to myself that my previous image wasn’t just some kind of fluke. The featured image in this blog is the region just to the left of and a little lower than the Orion’s Sword image above. Horsehead and Flame nebulas surround the eastern-most star of Orion’s belt, Alnitak. like Orion and Running Man nebulas, they are surrounded by an extensive region of dust. Something I knew from my original attempts at imaging this same region back in February was that there were lots of little reflection nebula everywhere. I wanted to bring those out. I also wanted to see what else was in the area. And so I did…my final image of the year of 2014, I finally managed to achieve what I’d set out to do about ten months prior: go deep, and bring out ALL the dust. I managed to reveal more little bits of faint blueish reflection than I think I’ve ever seen in images of the same region. I’ve seen a lot of images of this region, most more heavily red, which I think may drown out a little bit of the reflections off the dust. There are some bits of blue reflection that I don’t think I’ve ever seen before, which was quite satisfying. I also noticed, while processing the image, that the whole region was packed with little galaxies, barely visible behind the dust:
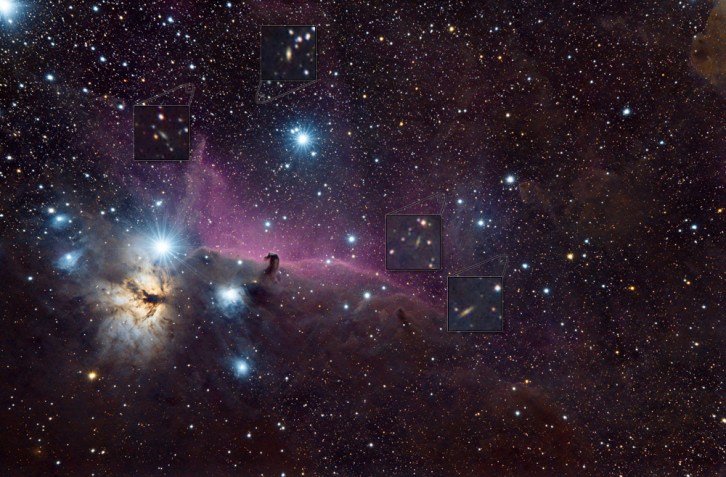
Galaxies within the Dust
I believe I have finally found my footing when it comes to my astrophotography. I did not expect to reach this point this quickly, I suspected it would have been closer to the end of next year, and quite probably with a host of more advanced equipment, before I was creating images that I felt I could print and hang on my walls. I’m quite satisfied that I managed to figure out what was holding me back from achieving my goals, what was keeping me from fully revealing what I knew was there, in the frame, just buried within the noise. With a new year now here, I’m very excited about every new clear night ahead. Imaging at a dark site is 100 times more efficient than imaging from my back yard. What was literally taking me months to do before, is now taking me two, three, five hours under truly dark skies. I used to think, “I’ll spend all winter getting data for this one object”, which was a little depressing. Now I think “I’ll spend the first six hours of the night getting data for object A, and the next six hours getting data for object B!”, which is rather liberating! It takes far less time to process the data and bring out the faint details with data from a dark site as well, as the data is much cleaner, less noisy, more accurate. I’ve spent about a day and a half working on my last two images of 2014…when previously I could literally spend several weekends, including Friday nights, on each image.
Well, here’s to a new year, hopefully full of crisply clear, windless nights! I’ll see you again soon.
6 Comments
Comments are closed.

Jon,
Amazing astrophotos, this gives a wealth of information on your journey from start till now and it will help newbies like us to get a sense of what to expect, I got in this game last year after a visit to a dark site here in NJ, I sought about to get a scope and eventually bought a dobsonian (10″) got to know the sky little bit and also got some ok pictures of planets. However that wish of taking some of these kinds of pictures is always there, so now I am embarking on getting a gear to do some basic astro photography. I am planning to go to NEAF this year and check out some mounts and potential scopes and I hope you wouldnt mind if I send you a question or two. Looking forward to more amazing stuff from you in the future and wish you all the success in future.
Samir
Hi Samir,
Glad you’ve found my posts useful. 🙂 I have a bunch of articles I am working on covering this subject in much more detail, so stay tuned. Also, feel free to fire questions my way if you have any, I’d be glad to help.
Aside from the images themselves, which are all gorgeous, I really love the wealth of knowledge contained in this brief description of your Astrophotography journey. I have only just begun to hunt for the proper equipment to get me on my way to starting, and I look forward to being able to look back with some success under my belt. Beautiful work, happy new year!
Hi Edward. Thanks for the comment! I’m glad to hear your getting into astrophotography. It’s a great hobby, if you like technical hobbies. I really enjoy it, and exploring the universe this way is also amazing. It’s one thing to see these kinds of images created by others…another thing entirely to create them yourself. You learn so much more about what’s up there, the stars that are there, the color and form of everything. You get to the point where you can look up at the night sky, and “see” things that you cannot really see…nebula and dust lanes and all that, you know exactly where they are, what color they are, where they are in relation to other things. Gives you a whole new perspective on the night sky. 😉 Let me know if you need any insights. Clear skies!
These are incredible images, Jon. Thank you!
Thank you, Jane! 🙂