Preliminary Analysis – ASI1600MM-Cool (v1)
The ASI1600MM-Cool camera from ZWO offers a quality, low noise camera at a highly competitive price. Upon receiving my monochrome cooled version earlier this year, I ran some data analysis on the camera, just to see how it performed. My analysis is geared towards those using the camera for pretty-picture astrophotography purposes. It has been demonstrated in other analyses that the ASI1600MM-Cool offers excellent linearity, good well depth, a level of flexibility at high gain that makes it well suited for scientific purposes as well (such as photometry, discovering comets and asteroids, expolanets, etc.) However this article aims to provide an analysis suitable for the artistic side of astrophotography. Future analyses may provide a more in-depth view into the scientific capabilities of this camera. With that purpose in mind, a couple of notes on the ASI1600 sensor itself before the analysis.
Readout Performance
The ASI1600 is capable of very high resolution, high dynamic range high speed video readout thanks to it’s low-noise CMOS technology. Frame rates up to nearly 30fps can be achieved with the full 16MP frame, and frame rates over 300fps can be achieved with a small enough ROI. In order to achieve the maximum frame rate, the camera must be used with USB3, as with USB2 you will eventually saturate the available bandwidth. With USB3, quality cables must be used, and if the camera is located farther away from the controlling computer than the length of the included USB cable, an active USB3 repeater cable must be used to maintain stability and reliability of the signal over the increased distance.
The quality of the image from this camera at high frame rates is extremely high. The dark current is effectively non-existent with the short exposures of video frames, and the extremely low read noise gives a very clean, fine gaussian grain over otherwise sharply resolved and bright details in planetary and lunar images. The small pixels, at only 3.8 microns in size, allow for very effective oversampling for planetary imaging without the need to use excessive magnification. Adequate sampling can be achieved with as little as a 2-2.5x barlow on an 8-11″ SCT.
Sensor and Noise
At the moment, we do not know exactly which sensor is being used by the monochrome models, although it is assumed to be a mono variant of the Panasonic MN34230 CMOS image sensor, which is used by the color models. This sensor is the same sensor used in the Olympus O-M1 camera, is 16 megapixels with a 3.8 micron pixel pitch, and is a very low noise sensor. The sensor uses integrated ADC per-column, and the ADC units are 12-bit natively. During binned readout, the sensor chooses to reduce bit depth to 10-bit, presumably to improve overall readout performance by reducing total data load. That makes binning viable for attaining maximum frame rate with high speed video, however it is not particularly useful for pretty-picture astrophotography imaging purposes as it restricts effective dynamic range to only 10 stops. This sensor is a very high gain sensor, which can make 10 stops of dynamic range a little problematic.
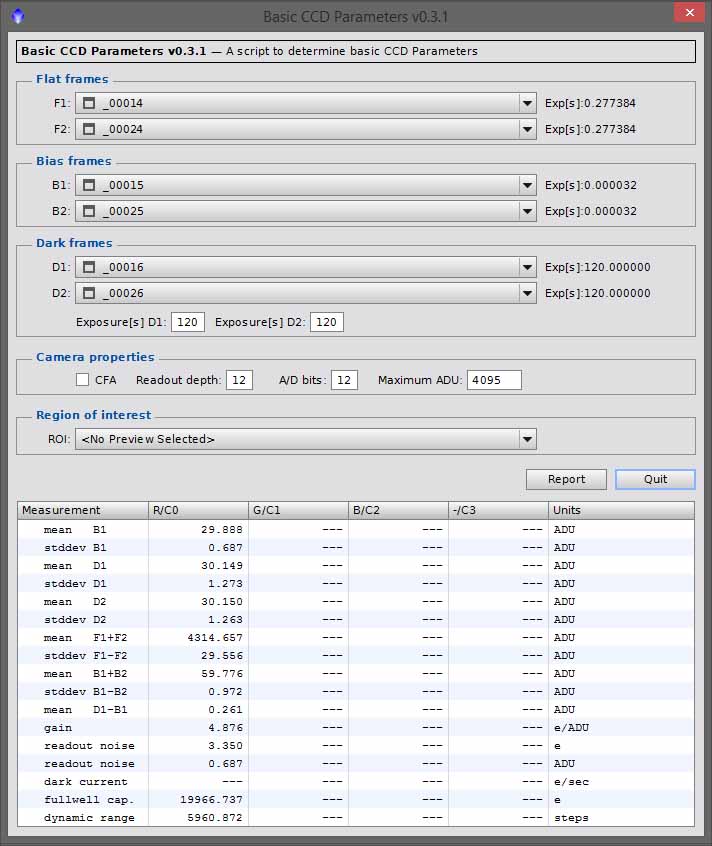
Gain 0 (Low or Minimum Gain)

Gain 139 (Unity Gain)
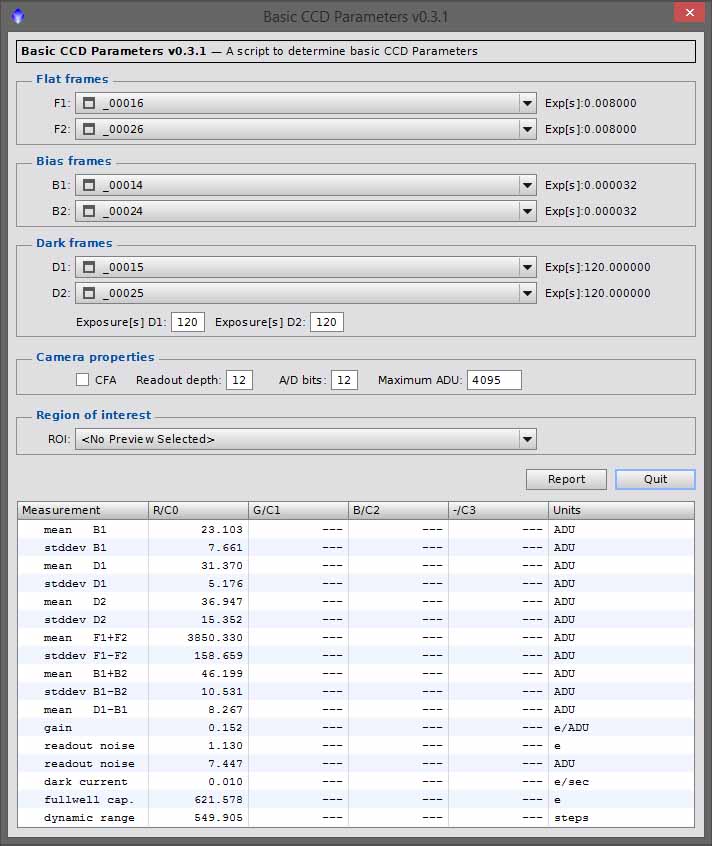
Gain 300 (High Gain)
Read noise ranges from 3.5e- RMS at minimum gain (Gain 0 driver setting), to ~1.5-1.6e- RMS at unity gain (Gain 139 driver setting), to as little as ~1.1e- RMS at high gain (Gain 300 driver setting). The ASI1600 camera supports gain settings up to 600, however dynamic range suffers considerably while read noise levels don’t change much when going beyond the high gain setting. The native full well capacity of the sensor is 20,000e-, and this FWC is available at the minimum gain setting. With the read noise of 3.5e-, that provides 12.52 stops of dynamic range at a maximum. At unity gain, dynamic range drops to ~11.43 stops, as the effective FWC drops to 4095e-, and at high gain dynamic range drops to ~8.8 stops, as the effective FWC drops to ~480e-. Dynamic range is effectively limited to 12 stops at most due to the 12-bit readout. In my own testing, I’ve identified a more “ideal dynamic range” gain setting of 75, which delivers double the FWC of unity gain at ~8192e- and about 2e- RMS read noise.
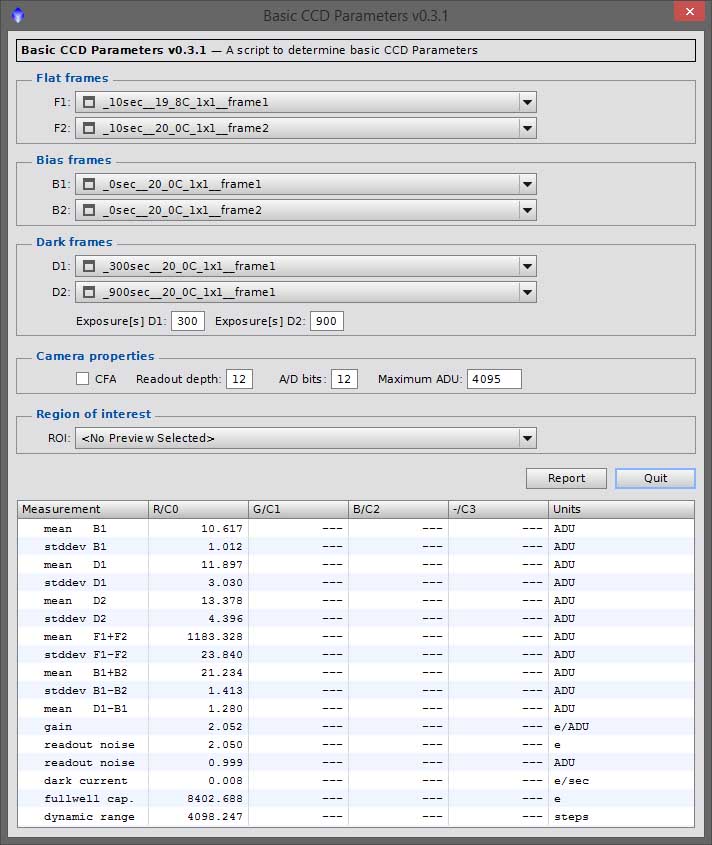
Gain 75 (Balanced Gain)
Amplifier Glow
One detracting trait of the ASI1600 is the amplifier glows. Amp glow used to be a problem with early generation CMOS cameras, and exhibited often with DSLRs in the early 2000’s. Some of the most notable amp glows occurred in the Canon 20D, early 1D series models, and even the 5D II, as well as some earlier generation Nikon cameras with Nikon manufactured sensors. The advent of more modern sensor technologies seemed to have eliminated amp glow as a major issue…however it seems to be making an unwanted comeback. Many newer DSLR models are exhibiting amp glows again. Particularly from Canon (which often exhibit bright bubble-like amp glows along the right side of the sensor, possibly two bubbles for full frame sensors), and even some Sony Exmor based cameras which exhibit glows as an overall general brightening around the periphery of the sensor. The ASI1600 appears to have joined the amp glow party, and exhibits some light amp glows in three primary locations…two soft bubbles along the right edge, and an even softer and fainter glow around the upper left corner. A driver fix early on completely eliminated a fairly large amp glow bubble emitting from the center left edge (make sure to use the latest ASCOM drivers to ensure this glow is removed!) This is an example of a 2000 second (maximum exposure) dark frame from the ASI1600 (using an early version of the ASCOM driver, which demonstrates the original left-side glow):

AS1600MM-Cooled 2000s bias-calibrated dark frame (original driver…current drivers no longer exhibit the left amp glow)
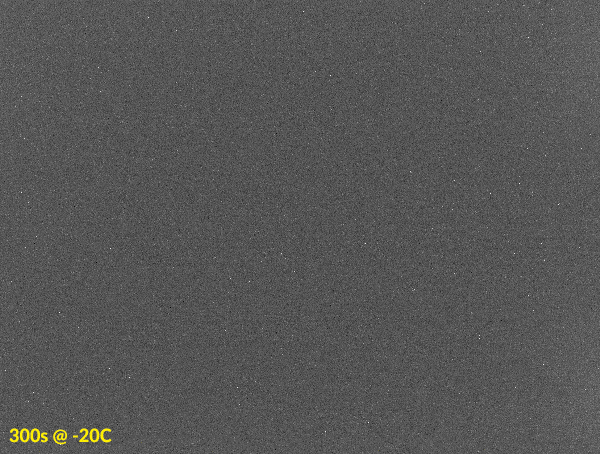
The glows are a problem only with particularly long exposures. They are a non-issue up through 300 second exposures or so, however beyond 300 seconds the glows begin to overtake the baseline dark current. By 600 seconds the glows are just beginning to be apparent, particularly on the right side. By 900 seconds all three glows can be clearly seen, and by 1200 seconds or longer, the glows become quite obvious and hot pixels can get a little extreme. Beyond 900 seconds, the glow growth overtakes dark current, and will increase the overall dark signal offset as well as hot pixel counts. Glows affect the dark signal non-uniformly, so getting a solid read on how much of the dark signal is simple dark current vs. glow is difficult. This is an example of glow growth with increasing exposure from 300 seconds:
The good news, however, is that the glows calibrate out extremely well with darks that are well-matched in temperature. Since the camera is cooled and thermally regulated, getting well matched dark frames is very easy. When calibrating with a properly matched master dark, it is very important that the calibration be performed without any kind of scaling. Dark scaling or dark optimization will rescale the dark relative to the light based on noise evaluation routines (or perhaps a fixed scale factor, if it is user editable), which due to the non-aligned nature of the glows to the baseline dark current, will result in improper scaling and a missmatch between the master dark and the light. This will leave behind fixed pattern remnants…including any banding if present, as well as some percentage of the glows (or, conversely, overcorrection of the glows resulting in a dark patch.) With proper calibration using unscaled darks, calibration works like a charm, as indicated by this calibrated 2000 second dark frame:

ASI1600 Calibrated 2000s dark
One key note about glow correction. While, done properly, it will fully correct the glows and remove their signal from the image, with long enough exposures the glows can add extra noise in the areas they occur. For your average single-panel astrophotography, this should never be a problem. Certainly not for LRGB imaging, and generally not for NB imaging. However, in the case of multi-panel narrow-band mosaicing, the increase in noise left behind where the glows were may present some difficulties in achieving seamless mosaic panel merging. This would only be the case with particularly long narrow band exposures, however…and that is actually unlikely to be the case with the ASI1600 under normal use cases.
Due to the nature of the variable gain with this camera, based on dark frame testing as well as real-world imaging, the ideal exposure lengths are usually around 300 seconds at unity gain, or 600 seconds at gain setting 75. Both unity gain and gain 75 are very high gain in 16-bit terms. The effective 16-bit gain at unity is 0.0625e-/ADU, while at gain 75 it is 0.125e-/ADU. Compared to the KAF-8300, which has a gain of 0.38e-/ADU, these are both extremely high. In practice, getting skyfog limited subs even with a 3nm bandpass is not nearly as difficult as it may have been in the past with higher noise cameras. Achieving a background sky level of ~15-20x the read noise at either unity or gain 75 within 300-600 seconds is definitely possible with 3nm Astrodon filters. Exposures longer than this tend to result in increasing clipping of the stars, even with a narrow bandpass. So glow issues will rarely arise in practice with this camera under normal use. The one particular scenario where they may become an issue would be imaging at minimum gain with very long exposures…which is not recommended in the general case (more on why later in this article.)
Dark Current Evaluation
The ASI1600 has very low dark current when cooled. At it’s maximum cooling performance for a 20C ambient temperature, which is approximately -20C, it’s dark current rate is 0.006e-/s. This effectively removes dark current, both it’s shot noise as well as it’s offset, from consideration given the nature of the ASI1600 the use of shorter exposures. For a 300 second exposure, less than 2e- dark current will be added to the signal, which is around 1.3e- dark current shot noise. For shorter exposures in the two minute or shorter range, dark current doesn’t even top 1 electron.
A quick visual evaluation of dark current at different temperatures, using 60 second exposures, reveals a fairly linear progression of offset:

For temperatures -15C and below, there are minimal or zero differences in dark current. At -10C there is a slight increase, and at -5C and above dark current starts to become a more significant source of offset (which will reduce dynamic range) and noise. The dark current doubling rate (as of yet to be exactly determined) with this camera seems to be lower than with many CCD cameras. Where a CCD may double nearly every 6C, this camera seems to double closer to every 4C. This is both a blessing and a curse. On the blessing side, we can reach extremely low dark current levels with less significant cooling. On the curse side, it means that uncooled versions of this camera are likely to be very noisy. As such, based on this evaluation, I do not generally recommend uncooled versions of the ASI1600, color or mono. If you wish to use this camera and get the most out of it, I highly recommend getting a cooled version.
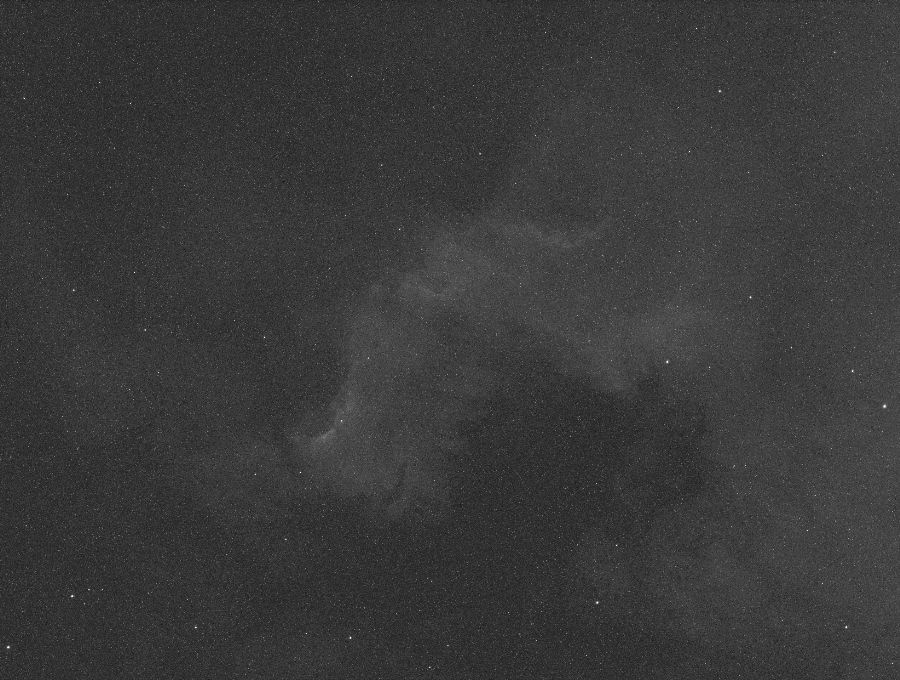
Below are several example images of The Great Wall in North America nebula in Cygnus. Each are individual subs, 90 second narrow band exposures, 3nm AstroDon Ha filter, at Gain 200. As you can see, without cooling dark current noise can be fairly significant, whereas with cooling it is practically non-existent.
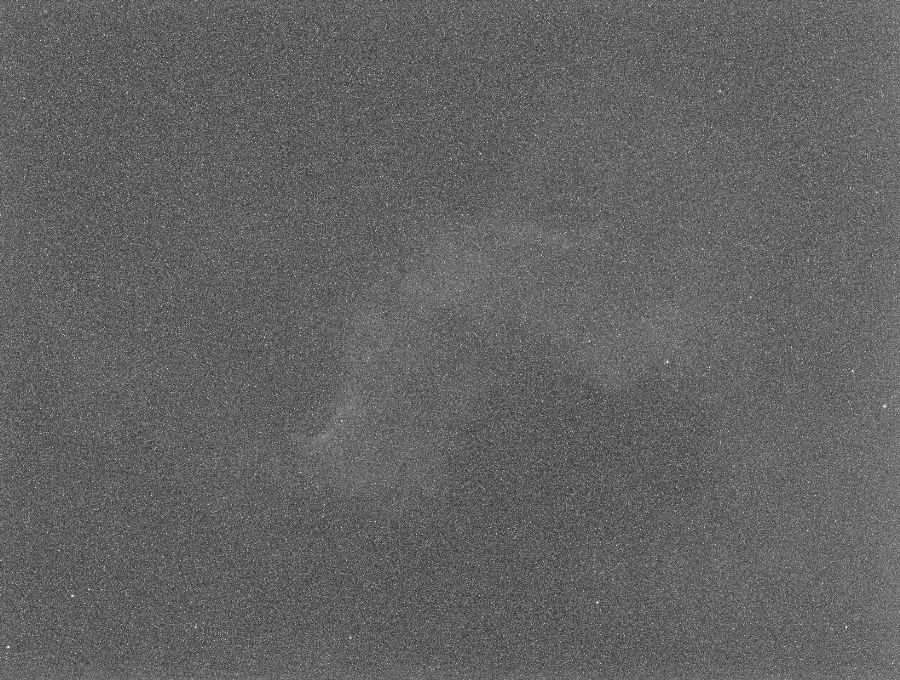
Sensor @ +20C, 90s exposure, 3nm Ha
Sensor @ 0C, 90s exposure, 3nm Ha

Sensor @ -20C, 90s exposure, 3nm Ha
Alternatively, a quick visual evaluation of dark current for different exposure lengths also reveals a fairly linear progression of offset:

For short exposures up to one minute with the sensor cooled to -20C, dark current remains fairly minimal. At 120 seconds and beyond, dark current begins to add a non-trivial offset and noise. Note that the increase in offset with longer exposures is less significant than it is with warming temperature, and at 1800 seconds in the center of the field the offset is 10-11e- (so, still quite small in the grand scheme of things). For narrow band imaging, I recommend sticking to 600 second exposures or shorter, as beyond 600 seconds the amp glows start to affect noise in the glow bubble areas more significantly (glow bubble offsets can be several times larger than the baseline dark current offset in the center of the field), which can have an impact on faint details with narrow band.
That said, I have found little reason to use longer than 600 second exposures with narrow band with this camera, as the read noise is so low such exposures will generally swamp the noise pretty handily. If necessary, and if possible (i.e. you have a cooler ambient temp), you can always cool below -20C. The doubling rate would mean that by -24C you would have around 0.003e-/s, and by -28C you would have around 0.0015e-/s, so by -30C you should have around 0.001e-/s dark current. As an important side note, the ZWO ASI cooled cameras have a maximum limit on cooling of -40C absolute. You can cool down to -40C, but the internal regulation of the cooler will keep you from cooling more deeply than that. It is possible this is due to the sourcing of mainstream sensors that may not be explicitly designed to handle extreme cooling, I cannot say for sure. I don’t believe most users of these cameras will need more than -15C to -20C of cooling, though, and to achieve -40C you would have to have a steady 0C or colder ambient temperature, which is not all that common anyway.
Further Evaluation
This is just an initial quick and dirty evaluation of the ASI1600MM-Cool. I will be performing a more in depth analysis of the camera, to determine more explicitly it’s noise characteristics, sensitivity, etc. This detailed analysis will come in a future article, as I research how to generate a PTC (Photon Transfer Curve) to fully evaluate the sensor, including it’s FPN. Stay tuned!
