PixInsights: SCNR (Subtractive Chromatic Noise Reduction)
Subtractive Chromatic Noise Reduction (SCNR)
One of the great things about PixInsight is it’s noise reduction tools. More than any other program I have used, the diversity and capability of PixInsight’s NR tools is unmatched. One of the wide variety of noise reduction tools in PI is SCNR. This simple tool is both critical, underrated, and usually a bit misunderstood. There isn’t much to it, and it is very easy to use, however to use it most effectively, one must understand exactly what it does so that proper optimization of the settings may be achieved. Don’t fret, though…learning how SCNR works and how to optimize it’s use is very easy.
SUBTRACTIVE Noise Reduction
The first thing to note with SCNR is the first key word in it’s name. Subtractive. SCNR is actually a very simple tool that solves a very simple problem: The misalignment of color channels (hence chromatic nr) at the noise level that results in one color channel producing a color cast over the background level of your image. The basic function of SCNR is to correct the shifts between the dominant color channel and the others by shifting the dominant channel left (to subtract from the channel), to neutralize the color cast.

SCNR Histogram: Before (Left) & After (Right); Note subtractive shift in green channel and normalization with other channels.
The result of applying SCNR can be observed in the histogram displayed by the HistogramTransformation tool in PixInsight. If you are running SCNR on linear data as I usually do, you will need to zoom in the histogram in order to get a clear view of the histogram. In the example above, you can clearly observe that the green channel is more dominant than either the red or blue channels before applying SCNR, while it aligns with the red channel after SCNR has been applied. This is the primary function of SCNR.
The SCNR Window
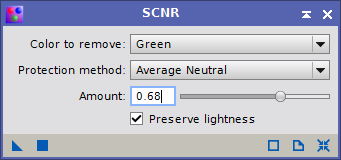 Before diving into the specifics of how to use SCNR, let’s first explore the tool window. SCNR is a very simple tool by PixInsight standards, where many have dozens of settings in multiple panels. SCNR only has four settings, and most of the time you will only need to adjust one: Amount. The other three settings include the Color to remove, the Protection method, and the Preserve lightness option.
After amount, the most often used option is the Color to remove. This simply allows you to select from Red, Green, or Blue, the three color channels that comprise all color images in PixInsight. SCNR defaults to Green for the color to remove, as this is most often the dominant color channel. However depending on the exact nature of your data, which may change depending on the camera and filters used, you may find that correcting another channel is necessary.
The lest frequently used settings are the Protection method and Preserve lightness. The latter option when enabled ensures that a reduction in the amount of the color removed don’t affect the lightness (CIE L’) of the pixels. This results in some redistribution of lightness information from the subtracted channel to the other two. The former option we will go into more detail on later in this article.
It should also be noted that SCNR does not care what kind of data it is run on…it will function just fine on linear data as on non-linear (stretched) data. My personal preference is to apply SCNR as part of my overall color calibration workflow, after applying DBE, BN and CC to my linear integration.
Why SCNR is Necessary
One question you may be asking is, why is SCNR necessary? The primary reason you may wish to use SCNR is to eliminate a color cast. Color casts can be removed in a number of ways, however most alternative options will affect star color as much as background and nebula color. For example, using curves to reduce a green color cast by pulling down the green curve a bit can be effective…however it will be a non-linear change to the image. It will shift the tones at the point where you drop the curve more than the tones that are darker or lighter. It will also affect star color in the event that the change is made to the midtones or brighter.
SCNR is a protected and star-neutral way to correct color casts, thanks to the Protection method. This ensures that background and nebula color casts are properly corrected, while star color, which is broad spectrum and therefor will include green as a necessary and non-trivial component, remains unaffected.
Determining Amount
The key to getting the best results with SCNR is to identify how much subtractive shift in the dominant color channel is necessary. This is the Amount setting. If you have read about SCNR in the past, you may have encountered the most basic usage pattern…to simply apply it at the defaults, with amount at 1.0. This will usually work, however it may remove more green than is necessary. That can lead to a background that is almost bicolor in nature…with apparent blue and red channel noise where those colors dominate, and an overly neutral gray everywhere else. This can remove some nuance from your background as well as from fainter nebulosity. While dominant green in nebula is uncommon (although not actually impossible, there are gasses that emit some green light, such as the yellow-green emission from sulfur or a fairly strong green emission line from helium, among other “forbidden” emission lines from various other gasses), some amount of green light is important to maintaining good color balance and good color diversity.
Returning to the example histogram from before, enlarged a bit more to show the divergence between channels:

The ideal usage for SCNR is to apply just enough subtraction that the BACK end of the green channel aligns with the second most dominant color channel. In the case of the histograms above, this second most dominant channel is the red channel, with the blue channel trailing third. Note also how the right side of the histogram as it tails off into the brighter tones of the image…our stars…the distribution of color normalizes. We want to protect this, as stars are broad band emitters, emitting light across a broad spectrum, including the full visible spectrum as well as infrared and UV, and even broader ranges such as x-ray and possibly even radio frequency for some stars.
This is unlike emission nebula, which primarily emit discrete lines, such as Hydrogen-alpha, Sulfur-II, Oxygen-III, etc. There are some faint nebula emissions in the green range of the spectrum, but they are a good deal fainter than the others and often don’t contribute enough to the overall color of nebula to matter a great deal…not, at least, with both interstellar and atmospheric extinction often dispersing that light almost entirely. Nebula, being much fainter than starlight, tend to be represented more by the back end of the histogram than the front end, and this is really the area we are most concerned with when using SCNR. We want the three channels to be roughly aligned there, or at least closely and evenly distributed. Green can be an obvious and overpowering color in nebula, so aligning it with the second most dominant channel is usually what you want to do. This is what proper alignment looks like (Average Neutral, amount 0.63):

This balancing of red and green, which is usually the alignment you will get with unfiltered imaging with a DSLR at a dark site, delivers a neutralized color. If you use an amount that is too small, then the corrected channel will usually still lead, and thus is still likely causing a color cast, albeit a smaller one. If you use an amount that is too high, the corrected channel will usually end up trailing the second most dominant channel too much, allowing that channel to dominate. With Average Neutral protection, a 1.0 amount results in the corrected channel landing midway between the other two channels. If there is minimal separation between those channels to start with, then this is fine, and probably exactly what you want. However, if there is too much separation between the other two channels, then using a 1.0 amount can result in the second most dominant channel introducing it’s own color cast.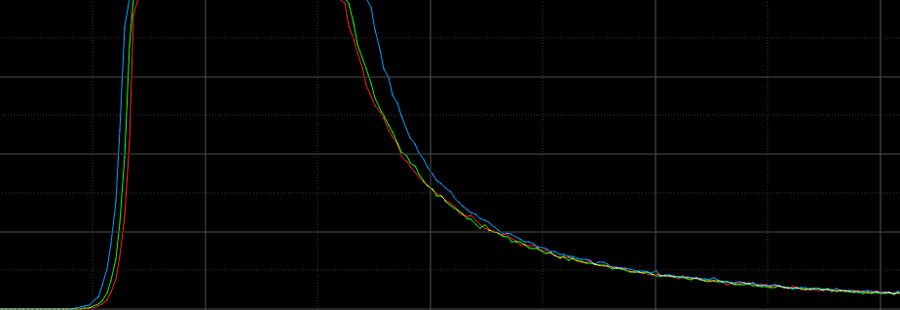
You want a balanced color for your fainter details. You don’t want to see color noise artifacts appearing as a result of SCNR, nor do you want another color to take too much dominance and add it’s own cast. Examining the histogram and identifying what kind of gaps exist between the color channels to star, and which one leads, will help you decide which channel needs correcting, and how much. Narrowly separated channels can support a higher amount than more widely separated channels, however you will need to experiment. If green is indeed the color cast you are trying to correct (this is most common for DSLRs, and quite common for LRGB…narrow band can go any which way, depending on how you process), then try not to obliterate it, try to align it with the next most dominant channel instead unless that still leaves and obvious color cast.
The Protection Method
Earlier in this article I mentioned that SCNR was a star-safe way to correct color casts in your images. This is thanks to the protection method, which allows you to choose one of several algorithms that are applied to each pixel to determine the amount of information of your chosen color channel to “remove” from that pixel. By remove, we really mean the value to subtract, which results in a leftward shift in the histogram. There are five available protection methods in SCNR:
- Maximum Mask
- Additive Mask
- Average Neutral
- Maximum Neutral
- Minimum Neutral
The default protection method, and the one you will usually want to use, is Average Neutral. I’ll get into the specifics of each protection method in a moment, however average neutral will usually provide you with the right amount of protection, while introducing the fewest color issues. Average neutral protection can be used at a wide range of amounts, and allows for a high degree of control over the amount of color cast correction that can be achieved, making it ideal for most images. I find that I generally use amounts around 0.7 for most of my images, however I’ve used as little as 0.2 and as much as 0.95, so it really depends.
The Maximum Neutral and Minimum Neutral methods are also color neutral, however they are not quite as flexible as Average Neutral. The range of useful amounts is diminished for both, particularly for Maximum Neutral which generally only works somewhat well at 1.0…and usually not enough. Minimum Neutral seems to work better around 0.5 or less, but again it’s effectiveness is often limited compared to Average Neutral. These two methods may be more useful for certain masking scenarios or intermediate processing steps.
Not every protection method is “neutral”…and by that, I mean color neutral. The Maximum Mask and Additive Mask methods are non-neutral, and have a tendency to drive the overall image color towards magenta unless very low amount levels are used. With these day protection methods, amounts up to perhaps 0.05 may be used, however usually 0.01-0.02 are more appropriate. This greatly reduces the resolution of the amount parameter, to near uselessness, and I have not yet found a purpose for either of these two methods in my own work. These may be useful for masking or intermediate processing steps.
Protection Method Algorithms
Each protection method controls exactly how the corrected component of the chosen color channel is determined. The formulas use several terms, which I’ll cover in a moment. The main parts of the formula are the generation of the “mask” term, or m, and the generation of the (C)’ term, or the corrected component of the given channel. All the possible terms are:
- a: The configured Amount
- m: The calculated Mask
- R: The RED channel vale of the pixel
- G: The GREEN channel value of the pixel
- B: The BLUE channel value of the pixel
- (C)’: The computed component of the selected color channels to correct.
- The C here will be either R’, G’, or B’, depending on what color channel you choose to correct
In the event that we have chosen the green channel, G, as the channel we wish to correct, then the R & B channels will be used to produce both the mask, m and the component of correction, G’, according to the rules of each protection method like so:
- Maximum Mask
m = Max(R, B)
G’ = G * (1-a) * (1-m) + m*G - Additive Mask
m = Min(1, R+B)
G’ = G * (1-a) * (1-m) + m*G - Average Neutral
m = (R+B)/2
G’ = Min(G, m) - Maximum Neutral
m = Max(R, B)
G’ = Min(G, m) - Minimum Neutral
m = Min(R, B)
G’ = Min(G, m)
If an alternative color channel is chosen, the necessary terms that must be swapped around should be easy enough to determine.
Workflow
The last thing you need to know about SCNR is the possible workflow options. SCNR can be applied to both linear and non-linear data, so technically it could fit anywhere within your workflow. In my experience, running SCNR more than once usually does not change much, as once you have corrected the channels, the (C)’ factor becomes extremely small on subsequent applications. You may find that you can run it once in linear and once again in non-linear. It can be important to apply it at the right step in your workflow. For DSLR/Mirrorless/OSC data, as well as for LRGB data from a mono camera, I personally prefer to apply it as part of my color calibration routine. My normal preliminary linear workflow is to linear fit, remove gradients with ABE or DBE, neutralize the background with BN, then calibrate color with CC. After CC is when I usually apply SCNR, and is usually the only time I use it.
With narrow band imaging, SCNR can take on a much more significant role, as the separation in color channel alignment at the back side of the signal can be much more extreme. You will usually not perform any kind of standard color calibration with narrow band, instead you may experiment with different blends either with a scripted tool, or PixelMath. In some cases you may find that one particular channel has a much cleaner and deeper signal than the others, and normally this is Ha as it is so easy to acquire. This can result in the channel(s) that are dominant Ha overpowering color contribution from the other channels. In the case of a classic SHO palette, you will often find that green totally overpowers red and blue except in the few areas where SII and OIII have decently strong signal. You will usually find that green overpowers the fainter regions in particular. The use of SCNR can help here, by adjusting the dominance of the green channel…however you must be very careful about exactly how you align the channels. In some cases, actual neutralization of green here will result in no green at all appearing in your image, showing gray instead. The other two channels, being weak to start, will still appear weak. Sometimes it is necessary to under-correct in these situations, then use curves or other tools to improve overall color balance.It may also be necessary to mask such that SCNR only affects certain areas. (However, in the end, you will usually find that you simply need more integration time in the weaker channels to normalize the signal intensities…or even just to acquire SNR over 1:1 in the fainter areas…in order to get a better balance of color right out the gate.)
One final way SCNR may be used is on non-linear data that exhibits strong color casts in the outer parts of star profiles (particularly on brighter stars, particularly with reflecting telescopes that may have reflective halos and diffraction spikes). SCNR can often be the ideal tool to correct a strong color cast in such stars. It is important to use a proper star mask when applying SCNR here, to avoid decimating any other color work you may have done up to that point.
