Astrophotography Basics: Types of Mounts
Before getting started with astrophotography, it is important to find the right mount. There are a wide range of mount sizes and types, with cost ranging from as little as a few hundred dollars to thousands of dollars to tens of thousands of dollars for true high end mounts. Rarely is it the case that a high end mount would be recommended to a beginner (unless that beginner was independently wealthy.) There are several key kinds of mounts, from something as basic as a fixed tripod, to your tracking mounts such as the Alt-Azimuth and Equatorial mount. The kind of mount you will require will depend on what kind of astrophotography you are interested in, and in some cases, spending about a grand or so may be necessary to really be able to pursue the kind of astrophotography you may be interested in.
Types of Mounts
Not every mount is created equal, and some types are better for certain kinds of imaging than others. At the most basic level, a simple yet sturdy fixed photography tripod with a ball head is the most simple mount available. A tripod has it’s uses, but it will be severely limited, and only good for very short exposure imaging due to the lack of tracking. A step above a tripod is a camera tracker. These allow a DSLR or mirrorless camera to be attached to a simple mount that will perform some basic tracking across the sky, allowing longer exposures than a fixed tripod. Such a mount will greatly open up the opportunities, however they tend to be limited to small and wide to ultra wide lenses. Such a tracker will usually require a tripod as well, as they do not generally come with one.
Above your tripod and basic tracker are the altitude/azimuth or alt-az mounts. An alt-az mount does perform tracking, and they are frequently used with visual setups. Alt-az mount are also usually used with very large telescopes (20″ to many-meter diameters, often employed in university, scientific and professional observatory installations) due to their superior ability to handle extremely large and heavy loads. The nature of the kind of tracking performed by an alt-az mount can introduce something called field rotation, after as little as 25 seconds, which limits their usefulness for astrophotography without additional measures. A field derotator may be used to counteract the field rotation caused by using an alt-as mount, and that is usually the solution employed with large telescopes. Another option is to put an alt-az mount on a wedge, which will allow the mount base to be tilted according to your altitude (latitude), and only track in azimuth. This effectively turns an alt-az mount into an equatorial mount.
The last kind of mount I’ll be covering is the equatorial mount. This kind of mount is explicitly designed such that it can and will counteract the Earth’s rotation and track an object in the sky without any kind of field rotation. Equatorial mounts offer excellent tracking and are well within the realm of affordability for most amateur astrophotographers.
Fixed Photography Tripods
The simplest way to get started in astrophotography is to use a standard fixed photography tripod. This is the kind of tripod you might use for landscape photography. Best paired with a ball type tripod head, and smaller lenses, you can do both ultra wide field night sky imaging, also called Milky Way imaging, as well as star trails imaging. You do not require tracking for either of these types of images, and in fact star trails imaging cannot be done with tracking. Both types of imaging use very short exposures, on the order of tens of seconds, maybe a minute with star trails if you have an intervolometer.
Any tripod used for astrophotography will need to be fairly sturdy. While a wide field lens will absorb some motion in the stars due to vibrations, a lightweight tripod with thin legs will still likely result in motion in the stars, reducing detail. For star trails, too much vibration could lead to strange star trails. To maximize stability, either get a tripod without a central riser, or if it has one, do not use it. It also helps to extend only the thickest segments of the tripod legs, or not extend them at all and keep it at the shortest height.
A decent tripod might cost you anywhere from a few hundred bucks to nearly a thousand, depending on exactly what you get. Something with a carbon fiber weave, common with landscape photography, should do just fine, so long as it is a heavier duty model. Small, short, light weight tripods for high portability (i.e. the Gitzo Mountaineer/Traveler tripods) will usually not do unless they are used at their most collapsed.
Camera Trackers
A camera tracker is a mount that attaches to a fixed photography tripod, and provides some kind of tracking to counteract the rotation of the Earth. A tracker is a basic mount intended to be used with a small setup…a DSLR or mirrorless camera with simple camera lens. These trackers are not capable of operating with full sized telescopes, although if you have a very small, fast refracting telescope (i.e. 300mm or less), you might be able to get away with using one with a small camera on a tracker. The general use case for a tracker is to get better exposures of the Milky Way or large views of nebula and molecular clouds with lenses ranging from your ultra wide 10mm or so through maybe 200mm, or possibly 300mm with a smaller (and slower) lens. With focal lengths ranging from 10mm to 85mm or so, you should be able to use a tracker without guiding for decently long exposures (up to a couple minutes if necessary).
At focal lengths of 85mm and up, you will need to factor in guiding. Some trackers support guiding, others do not. With guiding, you will need to find a way to attach a small guiding telescope, like the Orion 50mm Mini or a small fast Borg telescope. You will need a guide camera as well, either something self-guiding, or one that works with software running on a companion laptop (i.e. PHD2). With guiding, longer focal lengths up to 200mm are quite viable when used with a tracker and exposures up to a couple of minutes.
There are several popular trackers. They come at a couple of price points, either the entry level ones at around $400-500, or the higher quality ones at around $1000 or so. An entry level tracker would be either the Vixen Polari or iOptron SkyTracker, or the SkyWatcher Star Adventurer. These are small trackers, they attach to the top of any standard tripod, and they can handle an average DSLR with lenses up to maybe 100mm. The Polari and SkyTracker do not support guiding, so the exposure times will be more limited at longer focal lengths. These are the simpler and easier trackers to use, and do not require a lot of setup. The Star Adventurer does support guiding, and is actually an equatorial design when used with the polar alignment wedge accessory, and could be used up to 200mm, maybe even 300mm if your careful and it’s small enough.
A higher grade tracker will cost you around a thousand or more. The two most popular are the Astrotrac and the Lightrack. The Astrotrac is the long established leader of the trackers, although for the full package it’ll cost you around $1250. The tracker itself will cost around $500, however to use it effectively you will also need the wedge, which costs another $350. There is also a pier, which provides a high stability alternative to a tripod, which will cost around another $400. This tracker has low periodic error of 5 arc-seconds, which is low enough that you can get longer exposures without the need for guiding. That makes this setup very simple, as you do not need any additional equipment to support longer exposures. That makes it a more viable tracker for longer exposures up to several minutes with longer focal lengths.
The Lightrack is a newer option, and a rival to the Astrotrac. It is a simple tracker, but with the build quality, precision and accuracy of the Astrotrac. The tracker itself costs about $550, however with the necessary accessories it tops out at around $1000. The Lightrack has extremely low periodic error of 2 arc-seconds over a four minute period, which with good PA would effectively allow unlimited exposure lengths even up to 200-300mm.
If you need basic tracking for very wide to ultra wide imaging, and don’t want to deal with a lot of hassle or weight, a tracker paired with a DSLR and basic camera lens is the best option. These can get you some truly amazing images, such these:
Alt-Az Mounts
I won’t go into alt-az mounts much. This coordinate system is relative to the sky, rather than the celestial sphere. That means the coordinates are capable of pointing around the visible sky as limited by the horizons (azumith) and elevation of the target object (altitude). As a general rule, they are less than ideal for astrophotography due to the field rotation problem. Solving the field rotation problem requires additional investment in additional accessories, which increases cost. The only time you would really want to use an alt-az mount is if you already have one. They are fairly common with visual package deals, such as those from Meade. If you already have such a mount, then a very cost effective way to get into astrophotography is to see if your model supports a wedge and can be configured to track only in azimuth once you have framed a target. If so, then a wedge tends to cost less than buying a full equatorial mount.
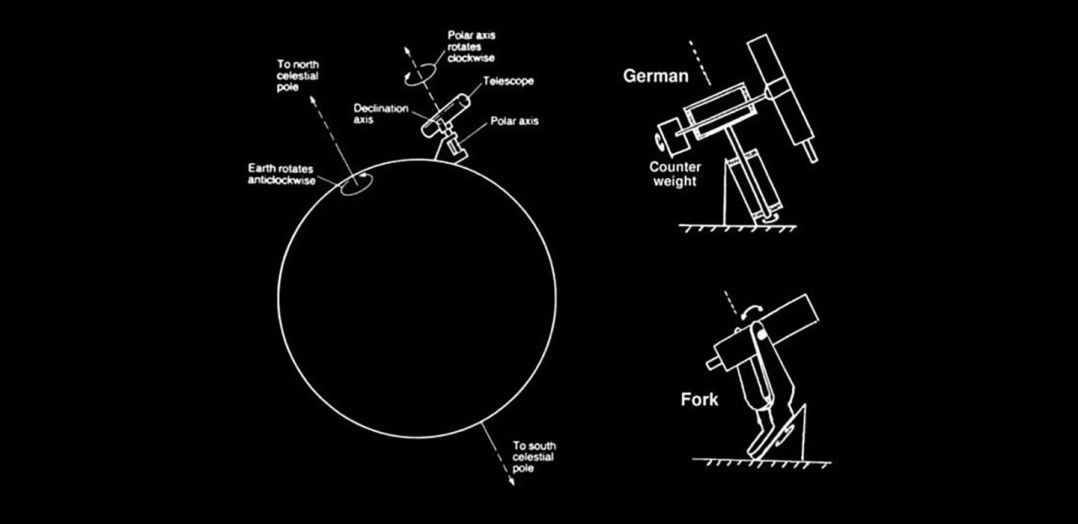
Equatorial Mounts
The primary type of mount most astrophotographers use is the equatorial mount. These mounts are specially designed to provide accurate tracking when properly polar aligned, and can be used for exposures up to 10 minutes, and beyond even if your skilled. The German Equatorial design allows ideal alignment of the rotational axis of the mount with the pole, which allows tracking in right ascension to counteract the movement of the Earth. Pointing anywhere in the sky is achieved with rotation in both axes, with right ascension accounting for east/west movement, and declination accounting for north/south movement. These two axes, RA (right ascension) and DEC (declination), are keyed to the whole celestial sphere, which allows every object in the sky to be identified with unique RA/DEC coordinates. Because this coordinate system accounts for the entire celestial sphere, one must ensure the proper time and location on Earth is set within the mount’s hand controller or control software, such that proper pointing for the given time of year and location can be achieved.
Accurate pointing and tracking with an equatorial mount requires good polar alignment, good leveling, and for a GOTO mount, good modeling of the sky. Unlike your basic tracker, a good equatorial mount that is ideal for imaging will have some kind of “goto” feature, allowing you to simply plug in coordinates, or simply select an object from a catalog of known objects (i.e. Messier or NGC objects), and simply tell the mount to “go to” that object, and it will. Good polar alignment and good leveling will generally get you within a reasonable distance of the object, usually close enough to find in a 20-40mm telescope eyepiece. However it often isn’t quite good enough for imaging purposes, where getting precise framing is usually a must. Most decent equatorial mounts will support some kind of sky modeling feature as well, allowing you to find well known stars, center them within your scope, and record the “proper” position relative to your alignment. It usually requires finding and centering at least four stars, preferably that many on each side of the meridian, to get good pointing throughout the sky (and additional stars should generally be added as the seasons wear on.) With a good model, pointing to any object in the sky, or any RA/DEC coordinate, should be precise within a few arcseconds, which is good enough to get accurate framing and re-framing of an object for imaging purposes.
While the Earth may rotate at a consistent rate, due to atmospheric refraction, elevation of the imaging site, etc. the actual rate at which objects move across the sky will vary from horizon to meridian. The general tracking of stars across the sky is approximated by Sidereal Time, however this only accounts for the motion of the stars across the sky relative to the length of a day and motion of the Earth around the Sun. It does not properly account for refraction. Most equatorial mounts will track in sidereal time, more advanced mounts (top end mounts, which usually start at around $8000 and go up from there) will sometimes track according to the king rate, which does account for atmospheric refraction. Both Software Bisque “Paramounts” with The Sky X software, as well as 10Micron mounts, support accurate and advanced modeling of the sky, and will account for atmospheric refraction and usually have low enough periodic error to support unguided tracking good enough for long narrow band exposures (unguided tracking up to 20 minutes is possible with precision polar alignment, leveling, balancing, and accurate modeling, making these mounts ideal for observatory installations.)
Being able to track at king rate without guiding is usually not a necessity, especially if you are not going to be using a fixed installation such as a personal observatory or even a fixed pier for your mount. For most imagers, those who will be setting up each night, and even more so those who may be “mobile” imagers visiting dark sites to image, will usually want to resort to guiding their mount. That brings in another common (and usually necessary) feature of equatorial mounts. They are guidable, usually via an ST-4 port at the very least, and often with supporting ASCOM drivers. Guiding, which I will go into more detail on in another article, allows inaccuracies in tracking due to sidereal rate, periodic error, and even environmental factors to be identified and counteracted. With effective guiding, even a lower end mount like an Orion Atlas EQ-G can be used to acquire 20-30 minute and longer exposures. This allows more cost effective mounts in the $800-$3000 range to be used for most imaging needs, which is especially a bonus for beginners who may not yet be sure astrophotography is a hobby they want to spend a lot of money on over the long term.
Most equatorial mounts designed to support astrophotography will also usually have some kind of computer software or driver support. The foundation of most computer software support for equatorial mounts is ASCOM, which provides a common communication paradigm for connecting to and communicating with a wide range of astrophotography equipment. If your mount supports ASCOM drivers, that will open up a whole world of convenient software control options, such as BackyardEOS/Nikon, APT, PHD, Sequence Generator Pro, MaxIm DL, and more. One of the most convenient programs are the planetariums. A planetarium program is one that presents a visual rendering of star and object catalogs of the night sky, which can make it much easier to find interesting objects for imaging. With ASCOM, you can also control your mount, and tell it where to point at the beginning of an imaging session, taking the guesswork and tedium out of pointing and framing.
Equatorial Mount Options
For the best deep sky imaging results, an equatorial mount is a must. For beginners, equatorial mounts start as little as $800 new, even cheaper used. Some of the best offerings are the EQ5 and EQ6 based mounts, including the SkyWatcher EQ5, HEQ5, EQ6 & AZ-EQ6, as well as the Orion Sirius EQ-G (EQ5-based), and Orion Atlas EQ-G (EQ6-based) and Orion Atlas Pro (AZ-EQ6 based). These mounts come at good price points of around $1000, $1400 and $2000 respectively (in the US.) They support imaging payloads from ~15lb up to 30-35 pounds, which is quite admirable considering their cost (I image with nearly 30lb a good deal of the time on an Atlas, with great results.) All of them support a wonderful and free driver and control program suite, EQMOD. They require the use of an EQDIR cable, which usually costs around $40, but this allows one to ditch the Synta hand controller (which is great, but not ideal for imaging purposes) and go with full software control. EQMOD is an ASCOM compatible driver and control program that brings many new and enhanced features to this line of mounts. The EQMOD control program greatly expands the capabilities of the hand controller with multiple savable imaging locations, each of which support independent sky models, polar alignment configurations, custom meridian and horizon limits, and a whole lot more. Having imaged with an Atlas EQ-G and EQMOD myself for about two years now, I think I would be lost without the two (and I often wonder what it will be like if I ever upgrade to a higher end mount! ;))
Other common brands include Celestron with their AVX, CGEM and CGEM DX mounts. The AVX is a good visual mount, and one of the cheapest equatorial mounts available on the market, however the use of sleeve bearings in the declination axis often result in the mount presenting difficulties for imaging purposes. It CAN be used for imaging, however it is less than ideal, and only $200 cheaper than the Orion Sirius, which has no issues with it’s bearings. The CGEM mounts are good for imaging with payloads up to 20-25lb, maybe a bit more (although some imagers have noted concerns about non-periodic harmonics in the periodic error that are sometimes difficult to guide out.) Another good entry-level mount provider is iOptron, which sells the popular ZEQ25, an $800 light weight mount good for lighter weight imaging payloads up to 10-15lb. They also sell the EQ45, CEM25 and CEM60. The CEM mounts stand for center-balanced equatorial mount, and are a slight tweak of a standard equatorial mount that uses a different balance mechanism. The CEM25 is quite new, however some adventurous friends of mine have taken the plunge to upgrade their ZEQ25’s, and they seem quite promising. The CEM60 was introduced in early 2014, and is a level up in terms of grade compared to other mounts listed here, however for $3000 they offer one of the most intriguing options for the price. The CEM60 supports a larger payload than any mount mentioned so far, and supports more accurate encoding, which supports better tracking with lower PE. They still need to be guided, they are not quite at the level required for unguided tracking, but with lower PE guiding often becomes easier, and if you want one of the best mounts for the money, it’s one of the better options.
Finally there is a midrange mount manufacturer that has been in the industry for quite some time, and makes better mounts than average, although still not quite “top end” class: Losmandy. Losmandy mounts are beautiful in terms of their manufacturing. Smooth, clean surfacing, round edges, precision details. They are good, solid mounts if you buy a newer one, or purchase a used one that has been upgraded with recent upgraded official parts or third-party enhancements. Older Losmandy mounts had poorer quality gearing that gave rise to a healthy aftermarket upgrade business, and eventually some quality upgrade parts from Losmandy direct. With upgrades, it’s tough to find a prettier and more solidly built mount unless you jump up to the true top end, where you’ll spend no less than $8000 to get a fully functioning mount. Losmandy’s offerings are the GM8, G11 and Titan. The GM8 is their entry level option supporting a 15-20lb imaging load, and for a full package including tripod will cost $2500 out the door. The G11 sporting a 30-40lb imaging load bumps the price up to $3200, around the cost of a CEM60. With Losmandy’s reputation, if I had to choose between the two, I’d pick the G11…but it’s by a slim margin. The Titan enters the high end mount price range, topping $7000 for a fully functional package. While I have not heard of the Titan delivering unguided tracking performance, it does have a huge capacity of 100lb, and I have heard of imagers using imaging payloads up to 70-75lb with them. Not even an $8000 Astro-Physics Mach 1 or Software Bisque Paramount MyT are rated for an imaging payload that high, and to get a 70-100lb imaging payload with a high end mount capable of unguided tracking, your looking at a $15,000 or higher cost. The Titan deserves a mention if for no other reason than it’s rather amazing capacity at it’s price point.
Regardless of which brand you choose…if longer exposure astrophotography is your goal, especially for deep sky astrophotography with equipment weighing more than a few pounds, an equatorial mount is what you need. It’s the only option that can handle the load, and provide consistent long-term tracking across the sky (guided or otherwise).
