Nature Photography
Bird, wildlife, and landscape photography by Jon Rista
Exposing Meteors Brilliantly, Part 2: Setup & Exposure
Welcome to part 2 of the “Exposing Meteors Brilliantly” knowledge center articles. In part 1, I covered some of the preparatory requirements that will ensure your trip to photograph a meteor shower is a successful one. Now that you know what meteor showers to keep an eye on, and how to prepare yourself to photograph them, its time to learn a bit about wide field astrophotography, and how exposing for the night sky itself differs from exposing the night sky for meteors.
Meteor shower photography is a part of the larger field of “wide field” astrophotography. Wide field here refers to the angle of view of the scene. There are three main types of astrophotography: wide field, local system (or near sky), and deep sky. Wide field is about capturing the whole sky, and often some of the night landscape as well. The most common form of wide field astrophotography is milky way photography or constellation photography, often with a coniferous forest, the striated red rocks of Zion National Park, or a lake in the lower foreground. I’m sure most of you readers have seen a lot of wide field astrophotography, especially if you are here to learn a little bit about how to do it yourself.
Local system or near sky photography is about photographing our local solar system, and any of the objects within or near it. This includes the planets, the moon, the moons of other planets, comets and asteroids, the sun (with proper filtration!), any and all eclipses both solar and lunar, and any other body within our tiny local space hovering in the infinite expanse of our wonderful universe. Anything that involves a small portion of the sky, rather than the entire sky, which usually requires a narrower field of view, rather than a wide field of view (telephoto lenses rather than wide angle lenses). A lot of local system astrophotography can be done with telephoto camera lenses, or cheaper telescopes if they support DSLR adaptation. I will probably write some articles on local system astrophotography in the future, particularly of moon photography.
Deep sky photography is all about photographing everything beyond our local sphere. Stars other than the sun, star clusters, nebula, other galaxies, other stellar objects, etc. Deep sky photography is something I’ve loved for a long time, but have yet to have any first-hand practice at. I’m sure many of my readers have seen amazing photos of deep stellar objects like nebula, amazing star systems or clusters, of galaxies, etc. Such photography is very narrow field, requiring very long focal lengths (relative to DSLR lenses, anyway) in the range of 1200mm to 4000mm or more (depending on how deep you want to go).
When it comes to wide field astrophotography, there are a few key factors that come into play for making great photos. First off is staying within the theme. For fill night sky photos, either ultra-wide focal lengths (14-20mm) or a fisheye lens are generally required. For constellations, wide focal lengths (24-40mm) will usually suffice. You will want to go wider if you have a cropped sensor camera (APS-C, most cheaper DSLR cameras are cropped sensors, vs. FF or “full frame” which match 35mm film.) The angle of view is “cropped” with any sensor smaller than a full frame for any given focal length. Nikon cameras have a 1.5x crop factor, Canon cameras have a 1.6x crop factor. Mirrorless cameras are usually in 4:3 format rather than 3:2 format, and their effective crop factor is usually around 2x. For any given focal length, dividing the focal length by the crop factor gives you a general idea of what focal length you need to achieve the same field of view with an APS-C camera as with an FF camera. A lot of astrophotography these days is done with the Canon 5D II or III, the Nikon D800, and other full-frame sensors. A lot of it is around the 14-18mm focal length range. One would probably need a 10-22mm lens to achieve similar fields of view. Overall, it doesn’t really matter…if you have a 16mm lens, then use a 16mm lens, that will be fine…it will just look like a 24mm lens on FF.
Generally speaking, photographing wide field is about moderately high ISO settings and moderate exposures. The ultimate goal is to maximize sensor saturation. Getting a good, clean, vibrant shot of the night sky is all about signal to noise ratio, or SNR. The SNR of an image is the ratio between the brightest pixels, and the point in the shadows at which noise overpowers image detail. I won’t go into the specifics of SNR here, its rather technical and would involve a lot of math (we’ll leave that for another knowledge center article.) Night sky photography inherently works with very little light…many orders of magnitude less than what we work with during the day, or even in a dimly lit event hall or indoor nighttime wedding reception. In order to maximize SNR, we need to maximize the amount of time light from the sky passes through the lens and reaches the sensor. This means keeping the shutter open as long as possible, and using an ISO setting high enough to make sure that for that exposure time, stars become nearly pure white (you want them to retain a little bit of their original color).
The length of time you can keep the shutter opens depends on the focal length. When photographing the night sky, one has to be aware of the consequences of the rotation of the Earth. This causes the sky to “slide past”, and if you expose for too long, an effect called star trailing will begin to exhibit. Star trailing is when the stars move enough across the frame to start affecting additional pixels. Sometimes this is entirely the desired effect, and it is a common effect in wide field astrophotography. Shorter focal lengths allow for longer exposure times, while longer focal lengths limit your exposure times, before star trailing exhibits. (The best way to determine this is with the Rule of 600…a knowledge center article on this will come soon, however for meteor photography we’ll be using short exposures, so it is not necessary now.)
Long exposures at wide to normal focal lengths (24-50mm) and very long exposures at ultra-wide focal lengths (14-20mm) will cause a little bit of star trailing. A one-minute exposure at lower ISO (100-400) and 16mm will create short star trails a few millimeters in length…basically oval stars. Expose for an hour or longer, and you get some fairly effective star trails. Most of the time, the star trails photos you may find online with extremely long trails that curve around the local pole are composites of dozens, even hundreds of photos exposed one after the other for as long as possible without either causing too much heat, or running into the limitations of the camera (some cameras limit exposures to prevent malfunction or damage).
One could probably produce some interesting effects with star trailing and meteor photography by carefully blending multiple photos, a few dozen to a hundred of the star trails, along with a few interspersed photos of short-exposure meteor shots. I’ve never done this myself yet, although it has been something I’ve wanted to try. Perhaps a future knowledge center article will cover this in more detail.
For photographing meteors, you will want to avoid star trails. Unlike most wide field photography, photographing meteors is all about normalizing the time on pixels of meteor strikes with the stars. Meteors are very fast, even with a “slow” storm like the Geminids, if you expose for too long at too low of an ISO setting, the meteors will be very faint relative to the stars and any light pollution. To make meteors stand out brightly against the sky and any light pollution, the trick is to expose for shorter periods of time at very high ISO settings. Instead of ISO 400 or 800 at 15-20 seconds, one should expose at ISO 3200, maybe even ISO 6400, for 4-6 seconds.
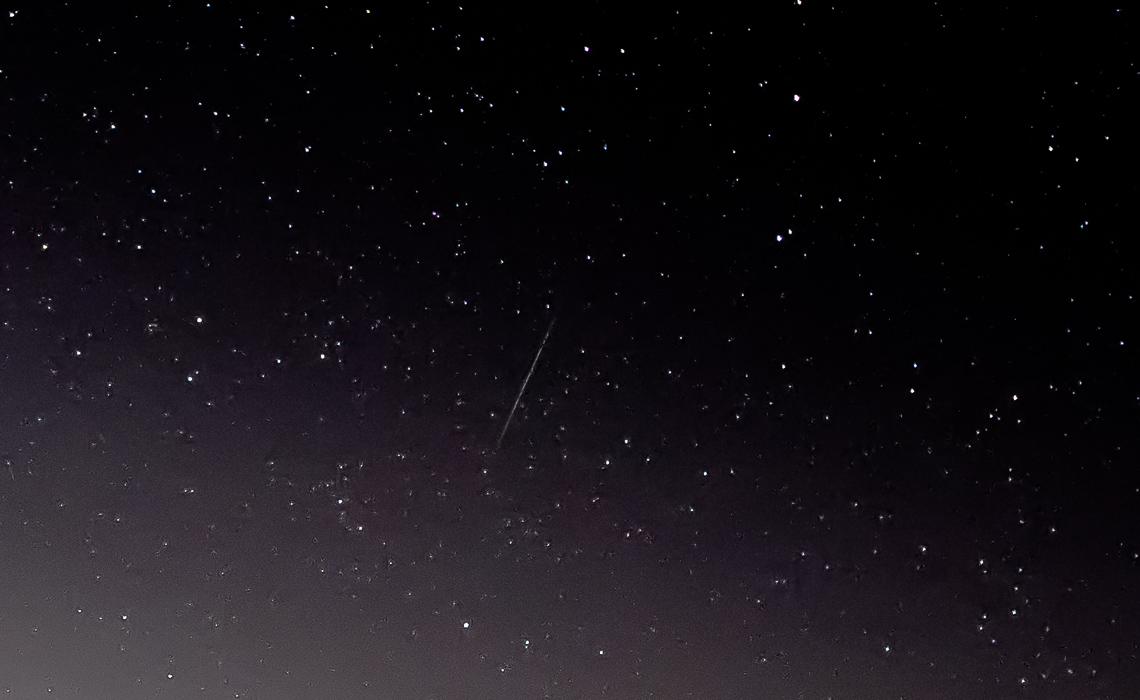
Why expose for shorter periods of time at higher ISO? The featured photos of both part 1 and part 2 of this article series demonstrate the purpose of normalizing “time on pixels” in meteor shots. The featured photo of Part 1 is a short exposure of a meteor…the meteor is very bright against the sky, and clearly overpowers the noise pollution from the city 30 miles away. The featured photo of Part 2 is a longer exposure of a meteor…the meteor is rather dim against the sky, and barely visible. A meteor may last for a few seconds. By making the total exposure time closer to the lifetime of the meteor, you make the time on pixels for both stars and meteors roughly the same…you normalize them.
Sometimes you might find that you are “normalizing” too much…that your exposure times are too short. The meteors will show up a bit too brightly against the stars, turning the tables and overpowering them instead. Ultra-bright meteors that are pure white often means those pixels have been “blown” (reached the maximum saturation point for the given ISO setting.) To remedy that problem…just lengthen your exposure. If your pixels are being blown, you might want to drop your ISO a little bit as well, however only do this if you don’t like the look of the meteors. It’s ok to blow out the pixels of the meteor if the overall appearance looks acceptable to you.
Last note on exposure…aperture. Depending on the lens you are using, you may want to stop down, or you may not. If you are using a lens that is f/2.8 or narrower, then you will probably want to shoot wide open. If your lens is soft wide open, then you MIGHT want to stop down a bit, but I would say try to stay at least at f/2.8. With a wider aperture, you’ll have a harder time focusing…but if you stick with it, a wider aperture will maximize the amount of light that reaches the sensor, and in turn improve your SNR. If you are using a lens with a maximum aperture wider than f/2.8, you will probably want to stop down a third or maybe two thirds of a stop. Ultra fast lenses (f/1.8, f/1.4, f/1.2) tend to exhibit strong optical aberrations (chromatic aberration, spherical aberration, field curvature, astigmatism, vignetting, etc.) when used wide open. This limits sharpness, often well below the diminished sharpness at minimum aperture (i.e. A 50mm f/1.4 lens is usually much softer at f/1.4, f/1.8, and even f/2 than it is at f/22!) Stopping down a little will sharpen things up a bit, while still utilizing a wider aperture. An f/1.8 lens should probably be stopped down 1/3 of a stop. An f/1.4 lens should be stopped down 1/3 to 2/3 of a stop.
Finally, on focusing. Focusing is best done with the live view mode of your DSLR. Unless you have a very good lens with a very smooth focusing ring, a manual lens with a long focus throw, or have a really damn good eye and a ton of patience, live view will probably be most helpful in achieving good focus. Manually focusing, especially with a manual focus lens with a long focus throw (throw is the amount of turn required to completely move through the focus range of the lens…most AF lenses have a throw of 1/3 to 1/2 of the circumference of the lens barrel…dedicated manual focus lenses such as those from Zeiss often have a full turn or more, which allows more precise, more finely tunable manual focus that is easier to tweak with the optical viewfinder.) Using live view, you can use the Contrast Detection live focus mode (vs. Quick or Phase Detection focus mode) to allow the camera to determine focus based on what the sensor is “seeing”. You’ll need to find a bright star, bring it to the center of the frame, and move the focus box such that the star is at the center, to get the best results.
It may be that you cannot see any stars in live view…sometimes they are just too dim (this is usually the result of being too near light pollution, which reduces the contrast of the stars, making them seem dimmer than they really are.) If this is the case, then you will have no option but to focus manually. Best to set your lenses to manual focus (this should actually be done anyway…as unless you reconfigure your camera for rear-button AF activation, triggering an exposure could also trigger AF), as this releases the AF motors in the lens, making the focus ring move a bit more smoothly in most lenses. The beauty of an optical viewfinder is that it is simply a pathway for light. When you arrive at the location you intend to photograph at, give your eyes 20 minutes to adjust to the darkness, and you’ll be able to see a lot of stars through the viewfinder (far more than the camera will be able to see in live view). With some careful tuning of focus manually with the lens in manual focus mode, you should be able to focus clearly.
It should be noted that if you are using a mirrorless camera (non-DSLR, such as an Olympus micro4/3), you may not have an optical viewfinder (OVF), or you might have a non TTL (through the lens) optical assist finder. You may only have an electronic viewfinder (EVF). EVFs are not well suited to focusing the night sky. They are limited by the cameras image sensor itself, and are effectively the same as live view…although usually with far fewer pixels, and often with poorer image quality. You might find that focusing with an EVF is impossible. Best to use the live view mode if you can, as they can be quite good…however they face the same limitations as the EVF or live view modes on DSLRs. I generally advise against using a mirrorless camera for astrophotography unless its all you own. Nothing can really beat an OVF for focusing at night, as you have the immense dynamic range and incredible low light sensitivity of the human eye at your disposal. 😉
Now that you know how to expose a meteor, without overpowering it with the stars and any potential light pollution, and without making the meteors too overpowering themselves, its time to set everything up and get rolling. When you set out to photograph a meteor shower, you should make sure you know where the radiant source is. These are almost always named after a constellation or star, so they are usually pretty easy to identify. If you need to bring along a star chart that you can orient to the sky at your chosen shooting location, do so.
Once you identify the radiant source in the actual sky on the night you go out to photograph, you will want to set up your camera or cameras. When the radiant source is directly overhead, it is often nice to use a fisheye lens on a camera and point it strait up. The wide 180° field of view will capture the entire sky and the surrounding horizon. Meteors will streak outwards towards the horizon from the center of the frame. You will need to sit near the camera to avoid becoming a part of the scene yourself…or you could stand out a fair ways to explicitly include yourself in the frame if that is your desire.
If you choose to be in the frame, standing against distant light pollution on the horizon, of a city 50 miles distant or so, should create a nice silhouette of yourself.
If you use a non-fisheye lens, you have a few options. You can either point towards the radiant source, and photograph the meteors as they enter the atmosphere…or point away from the radiant source, and photograph the meteors as they fall. You could also place the radiant source in a corner of the frame, allowing the meteors to streak across its entirety. If you have multiple cameras, you can point at the radiant and away from it, and capture both regions simultaneously.
It helps to observe the sky for a bit before the shower peaks, and get a general idea of the general area of the sky that meteors actually fill. A radiant source 45° above the horizon can effectively cover 270° of the sky in meteors. A radiant source directly overhead could potentially fill the entire sky with meteors. Not every part of the sky will get good meteor hits though…so figuring out where the good ones fall ahead of time is a good idea. Especially if you intend to photograph the sky away from the radiant.
Photographing meteors is all about hit rate. The majority of your frames are going to be empty unless you have the benefit of being in a prime zone for the show, where hit rate will reach the maximum (this is rarer). If you are able to experience 100+ hits per hour, then you’ll have a meteor in the sky at least once a minute, possibly more. More commonly, you’ll be in a moderate zone, where hit rate is lower, maybe half, of what it is in a ZHRmax zone.
To ensure you capture as many meteors as possible in the region of the sky you point your camera at, you’ll need an intervalometer. This is a device that will automatically set up and trigger an exposure for you, repeatedly, according to the settings you configure. Some brands of cameras include a basic intervalometer in the camera itself. More commonly, you have to buy an external intervalometer. These can range in price from $30 to $300, and the features scale accordingly. Cheaper intervalometers most often limit the total number of continuous frames that can be triggered…sometimes to as little as 150. A mid-range intervalometer that can be had for $50-$80 will probably give you a better maximum, and some will even allow 9999 exposures. Most intervalometers will also allow an infinite mode, where it will keep triggering exposures at your configured settings and interval delay until you manually stop it.
Most intervalometers will work either with the Bulb mode of your camera, or with any of the professional modes (P, Av/A, Tv/S, and full Manual). For meteors, you’ll probably want to set the exposure with the camera, and simply configure the intervalometer to trigger the exposure on a certain interval. It may depend on the brand and model, however most intervalometers will wait the interval delay and then initiate another exposure as soon as the previous is done. Some intervalometers in the cheap to mid range price will often start the interval delay the moment after it initiates exposure. If you have an intervalometer that behaved like the latter, then you will want a delay that encompasses the exposure duration you configure in the camera. For example, if you are exposing for four seconds, then you will probably want to set your intervalometer to five seconds, to give the camera enough time to close the shutter, return the mirror, and save the image to the memory card. (It helps to disable image preview as well, as that can lengthen the time between shots by however long the preview lasts, which is often 1, 2, 4, or 16 seconds.)
If you have to allow a delay between shots (even if it is only one second), it can really help to have two cameras set up over the same general region of the sky, both on their own intervalometers. Configure both cameras the same, and offset the first exposure by about 50% of the exposure time (i.e. if you are exposing for four seconds, wait two seconds before starting the second camera’s intervalometer.) This will ensure some overlap, and guarantee that you have the sky covered 100% of the time. This is more helpful in zones where you don’t get the maximum hourly rate, and meteors may only fall once every few minutes. Missing even one meteor can mean your hit rate is once every half an hour or more, which can lead to a fairly unproductive night. (Note that increasing your field of view can help as well…instead of using a 20mm lens, you can use a 16mm or 14mm a fisheye lens if you have one at your disposal. This can greatly increase the amount of sky your camera sees at once, thus increasing the chance that each meteor that enters the sky will actually fall within the bounds of your frame.)
Well, that is about it! You should be prepared to photograph meteor showers on your own now, and hopefully with excellent results and a high hit rate. If you are an avid sky watcher, keep an eye out for more articles on artistic astrophotography in the future. I have a lot of experience photographing the moon, and once I pick up a telescope, I’ll add articles on near sky and deep sky photography as well. Please feel free to ask me any questions you still have if this article did not cover them. You can use the form on the Knowledge Center page to contact me.
